

The most popular advice for tarnished jewelry is often the riskiest: scrub it with baking soda, soak it in a foil bath, or reach for a strong polish. Those methods may damage a costume piece before you know what its surface is made of. The safest first move is to identify what's changed, then use the least aggressive method that fits the piece.
Costume jewelry can look dirty when the plating has worn away, and no cleaner can put that finish back. A cautious inspection can help you tell the difference before you start.
Table of Contents
- Match the Cleaning Method to Your Piece
- Tell Tarnish from Worn Plating Before You Clean
- The Step-by-Step Cleaning Routine
- When Ultrasonic Cleaners and Ammonia Help or Harm
- Fix Green, Black and Dull Results
- Store and Wear Cleaned Pieces Safely
- Decide Between Home Cleaning and a Professional
Match the Cleaning Method to Your Piece
The strongest cleaner is often the wrong tool for costume jewelry. A mixed-material piece is not a solid lump of metal. One necklace might combine a brass, copper, or zinc alloy with thin plating, lacquer, glass stones, plastic, glue, and fabric. Those parts tolerate different treatments, so polishing the metal aggressively can strip its finish or damage nearby components. Conservation practice starts with dry dust removal and the gentlest method that suits the object. For a finish you have not assessed, keep cleaning limited and local rather than soaking the whole piece or using a chemical dip.
Skin reactions belong in the same decision. If the skin under a piece itches, turns green, or stays irritated after cleaning, stop treating the color as dirt. Cleaning may remove surface residue, but it will not change what the base metal releases against skin. The practical fix is to limit skin contact or retire the piece, not to scrub harder.
Before choosing a method, inspect the clasp, the inside of a ring, and the back of a pendant. Copper-colored or reddish patches may indicate that plating has worn through. A 925 mark indicates sterling silver, but a mark alone does not prove the whole piece is unplated. Many costume pieces are unmarked, so treat an unfamiliar one as plated unless its materials have been confirmed.
| Piece type | Safe first method | Avoid | Stop when |
|---|---|---|---|
| Plated base metal, no stones or glue | Barely damp soft cloth with one drop of mild, unscented soap | Baking soda, abrasive polish, chemical dips | Color transfers onto the cloth or the finish lifts |
| Silver-plated or silver-tone | Test a cotton swab with lukewarm water and mild detergent on a hidden spot | Toothpaste, chemical dips, aluminum-foil baths | The coating looks cloudy or the layer flakes |
| Uncoated sterling silver with a 925 mark | Wash first, then test a calcium carbonate slurry on a small area | Acetone, bleach, chemical dips | The metal dulls or the surface feels gritty after rinsing |
| Glued stones, pearls, enamel, or lacquer | Dry soft brush and dry microfiber cloth only | Any liquid or soaking | A stone loosens or the finish lifts |
| Fabric-backed or mixed-material pieces | Dry brush and lint-free cloth | Any liquid or ultrasonic cleaning | The fabric gets damp or a stain transfers |
| Solid metal with no glue, tested as safe | Ultrasonic cleaner with a compatible solution, following its instructions | Pearls, opals, porous stones | Repeated cycles do not improve the piece |
For a piece you believe is gold-filled rather than costume-plated, the Carat 24 gold-filled jewelry cleaning guide offers a separate material-specific reference. Do not assume its advice applies to a mixed-material costume item.
Baking soda and toothpaste can abrade thin plating, while vinegar can affect finishes, adhesives, and coatings. The most common mistake is choosing the strongest cleaner instead of the right row in the table. A piece that looks dull after cleaning may need a different method, not a harder scrub.
Tell Tarnish from Worn Plating Before You Clean
Is the black or green color dirt, tarnish, or the jewelry itself showing through? The assumption that every dark piece needs polishing can lead to permanent damage. Start by looking at where the color appears, then test gently.
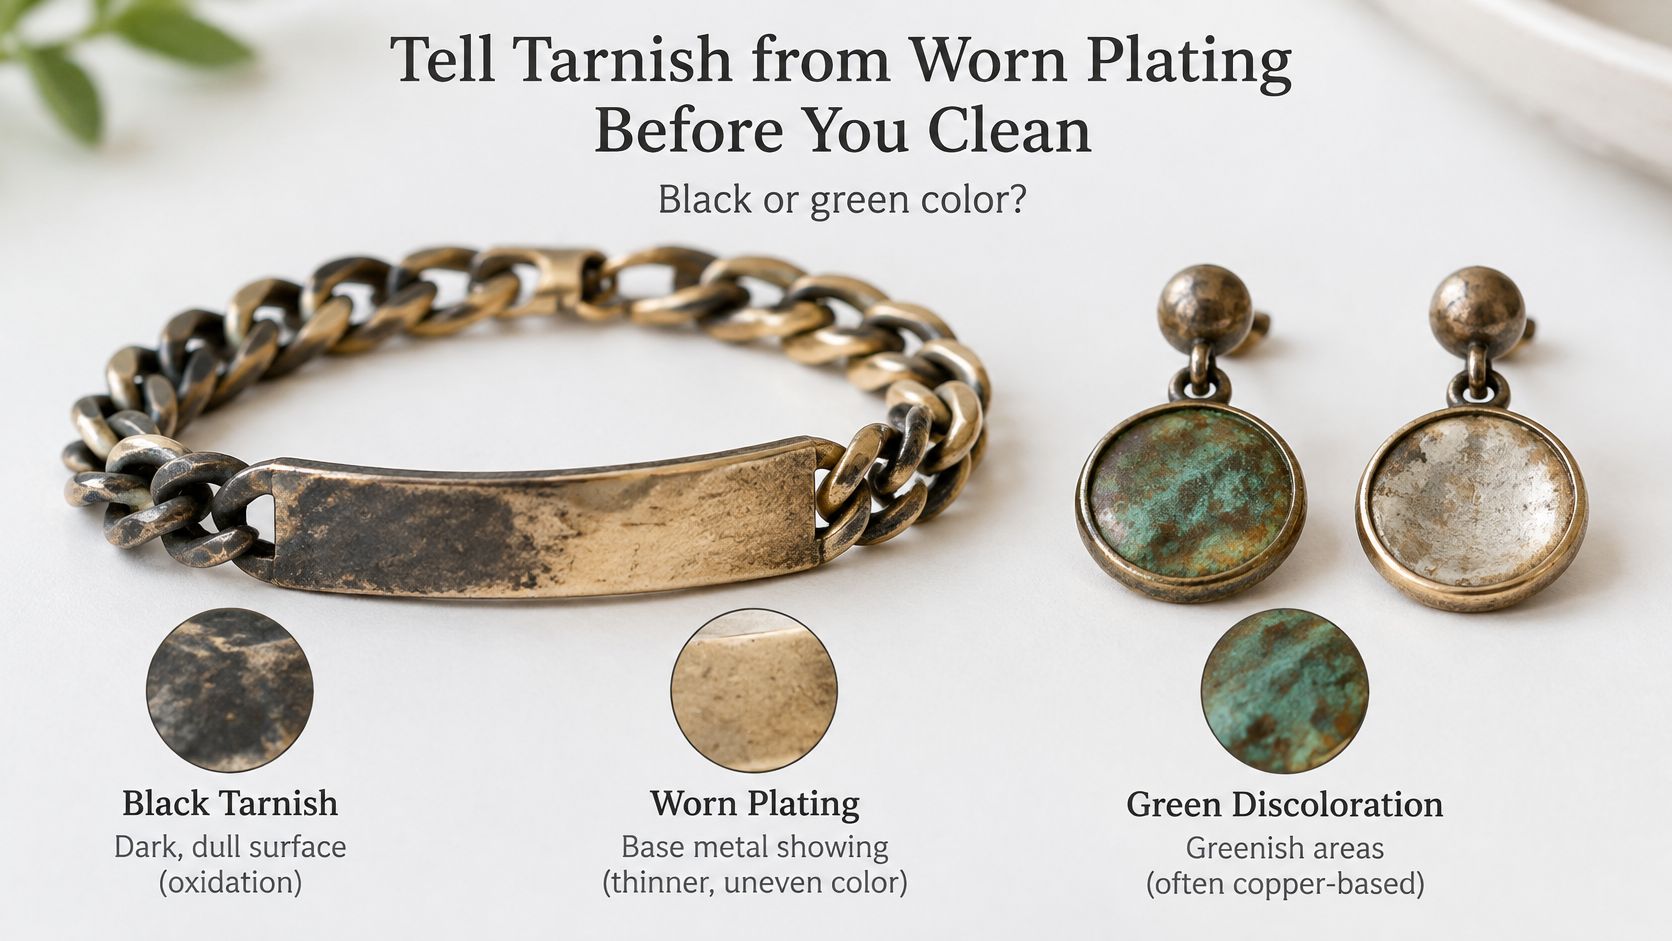
Tarnish is a chemical change on the metal's surface, not just dirt sitting on top. The Canadian Conservation Institute's guidance on silver explains that silver can darken when sulfur-containing gases in the air form a surface layer. Copper- and brass-containing alloys can also oxidize or corrode. A dark film may collect unevenly, especially in small recesses.
Worn plating looks different. The exposed base metal often appears as a flat brassy or reddish patch on an edge, clasp, or area that rubs against skin. Cleaning may remove surface grime, but it can't replace a missing decorative layer.
Try this quick inspection:
- Brush away loose dust with a soft brush. Grit can scratch the surface during further cleaning.
- Wipe a hidden spot with a dry microfiber cloth. If dark or colored material transfers, the spot may have surface residue or tarnish that gentle cleaning could improve.
- Look closely at any patch that remains. If the cloth picks up nothing and the metal underneath looks like a different color, the plating may have worn through.
- Stop at warning signs. A lifting gold-tone layer, a loose stone, or a cloudy coating means further cleaning could worsen the damage.
A jeweler can't restore worn plating by cleaning it. If the finish has failed, less cleaning is often safer than more.
For another perspective on preserving plated finishes, see this guide to caring for gold-plated jewelry.
Use the video as an additional visual reference for spotting differences in jewelry surfaces.
The Step-by-Step Cleaning Routine
Use this routine only if the piece passes inspection and its materials can tolerate a little moisture. It's meant for localized cleaning, not for soaking jewelry or trying to remove a layer that's worn through. Work over a clean, light-colored towel so a loose stone or component is easier to spot.
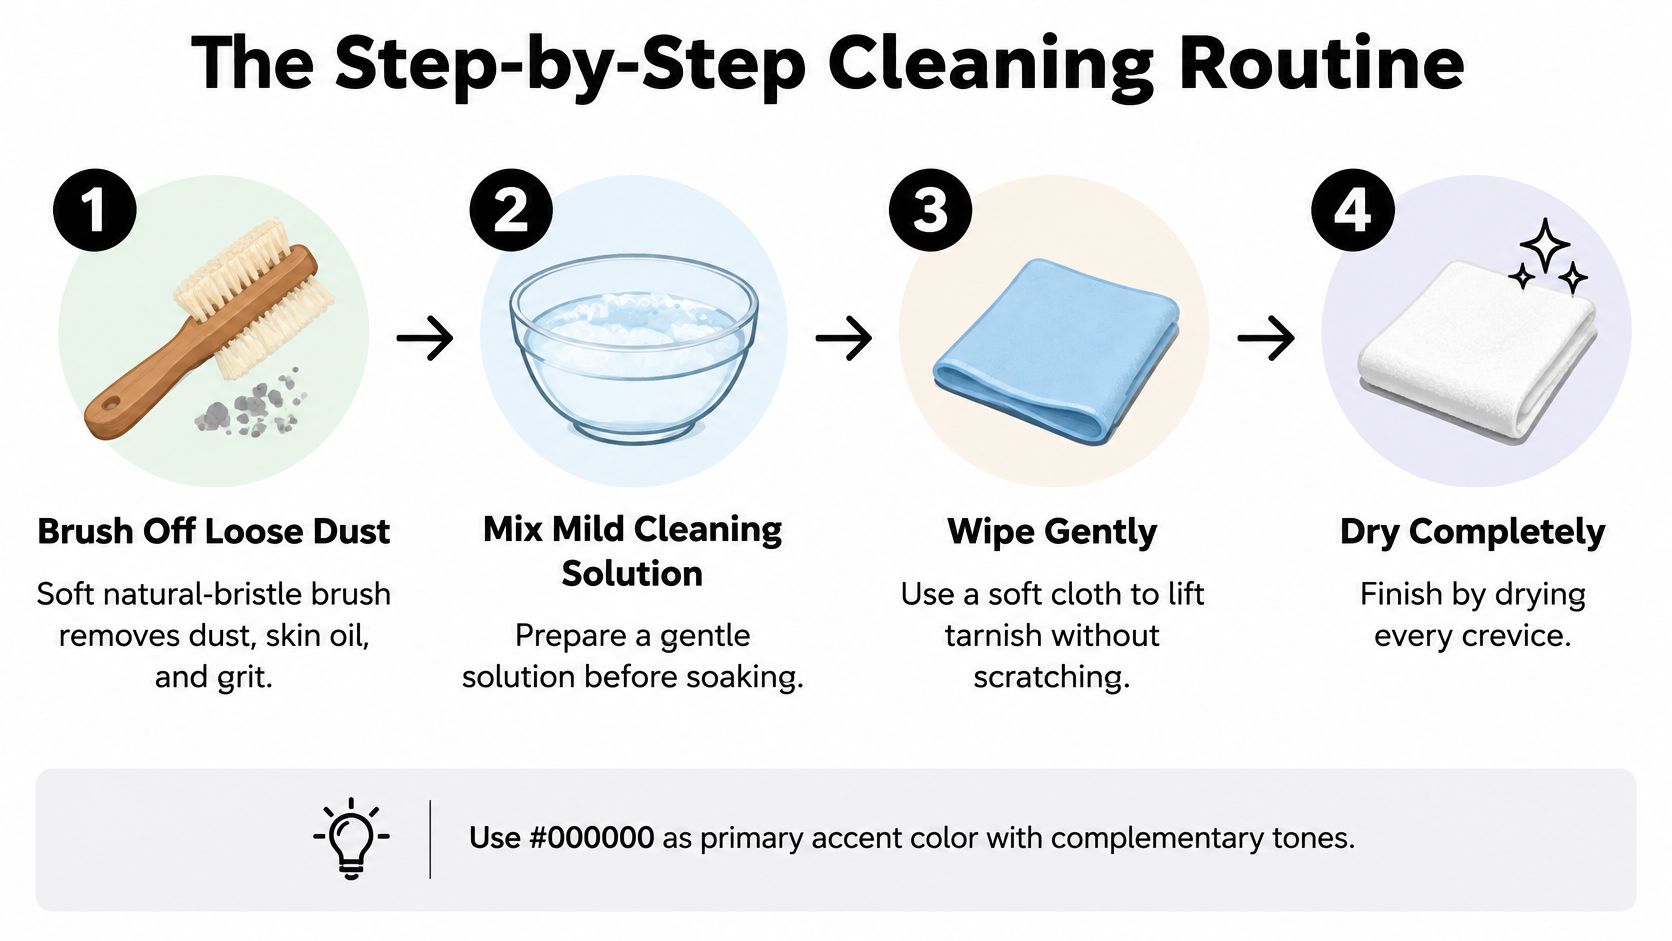
- Brush off loose dust. Use a soft natural-bristle brush to lift dust, skin oils, and grit before wiping. Particles left on the surface can act like abrasives and interfere with cleaning.
- Test a hidden spot. Dampen a cotton swab with lukewarm water containing a drop or two of mild, unscented detergent. Touch it to an inconspicuous area, such as the inside of a ring or the back of a pendant, and check for color transfer or a change in finish.
- Wipe one small section at a time. If the test causes no change, use a barely damp soft cloth or swab with light pressure. Keep moisture away from stone settings, glued joints, and clasps. Don't immerse or soak the piece.
- Remove the soap. Use a separate swab or cloth dampened with plain water to lift detergent residue. Work carefully so the rinse water doesn't run into settings or seams.
- Dry immediately. Pat the jewelry with lint-free cotton, paying attention to crevices where moisture can hide. If the piece's materials are suitable, warm air can help dry a difficult recess, but don't use heat on delicate, glued, or uncertain components.
- Check after each section. Stop if the swab picks up the jewelry's color, the finish lifts, the coating turns cloudy, a stone moves, or adhesive feels sticky. Those are signs to leave the piece alone and seek professional advice.
Skip toothpaste, baking soda, abrasive metal polish, and chemical dips on unknown costume jewelry. They may remove a thin decorative finish along with the tarnish. A good result is an even surface with no haze and no color coming off on the cloth. If a dark patch remains but the finish is intact, don't assume that more pressure will make it safe to remove.
When Ultrasonic Cleaners and Ammonia Help or Harm
An ultrasonic cleaner and a gentle hand wipe aren't interchangeable. Ultrasonic vibration can dislodge dirt from hard-to-reach places, but it can also loosen glued components, lift thin plating, or damage fragile stones. For costume jewelry, treat the machine as an exception, not a routine shortcut.
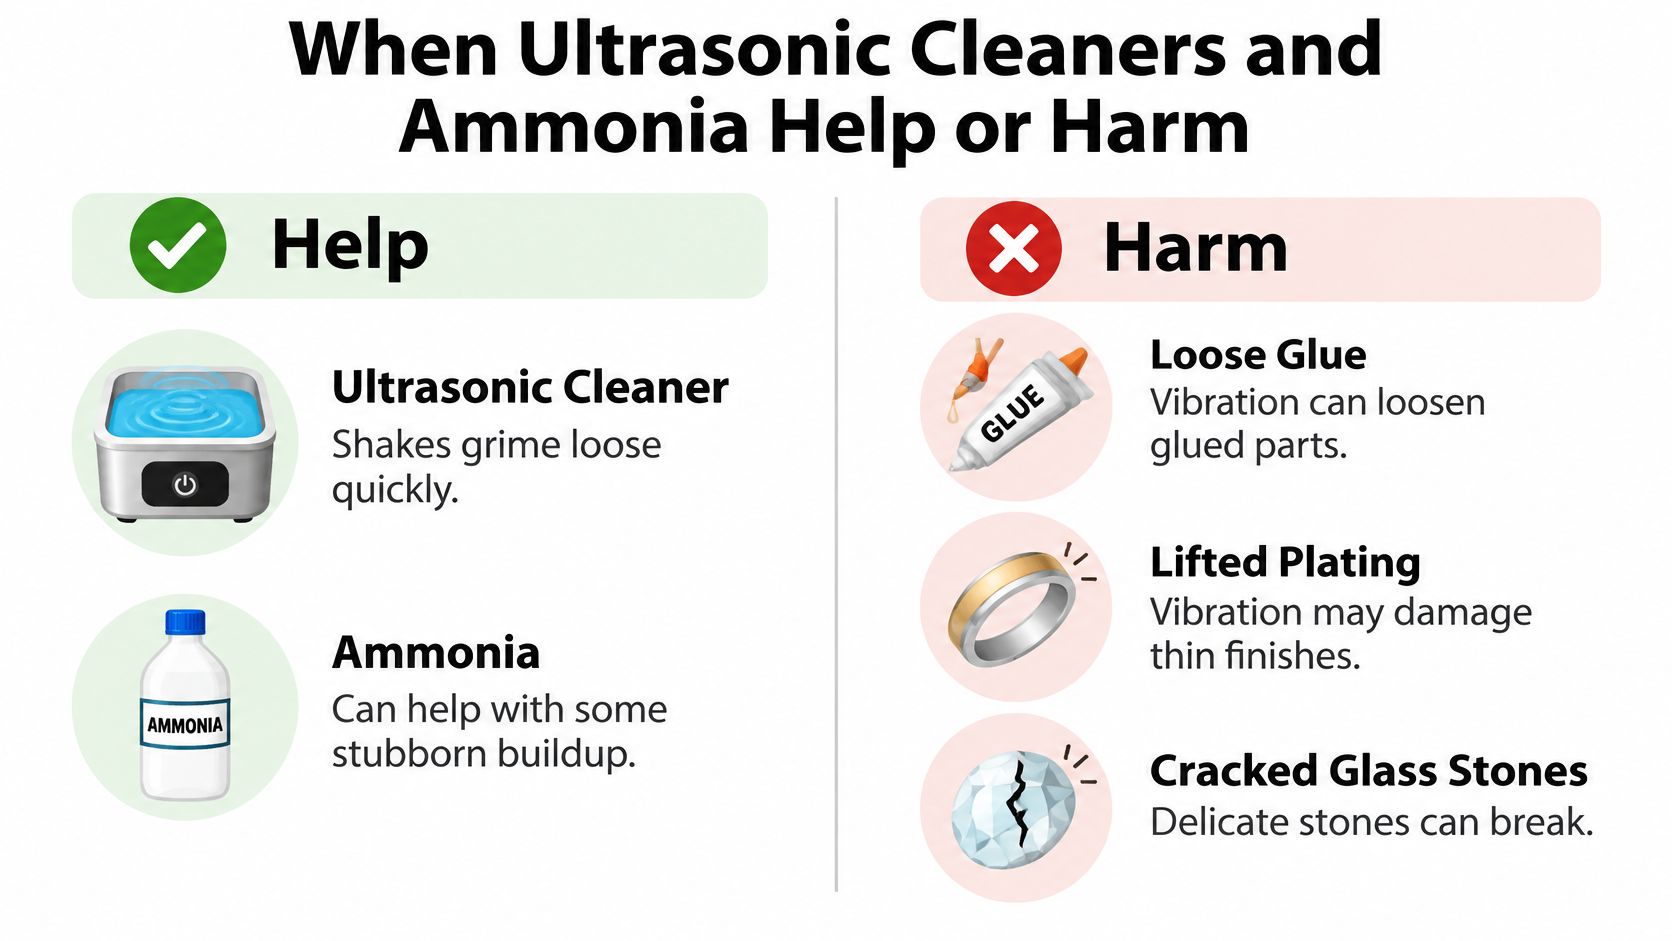
Use an ultrasonic cleaner only for a piece that's confirmed to be compatible: sturdy solid metal, no glue, enamel, pearls, or fabric, and no fragile or porous stones. The solution should also be made for ultrasonic machines. If the piece passes inspection and its materials are appropriate, use the solution label's directions, run one cycle, then inspect the jewelry before deciding whether another is appropriate. The Winterthur Museum's silver-treatment advice also cautions that polishing removes surface material and treats calcium carbonate slurry as a controlled method for confirmed, uncoated silver, not as a default for plated jewelry.
A jewelry cleaner can remove dirt, oils, and light tarnish, while heavy tarnish may need multiple cleaning cycles. Evo Dyne's jewelry cleaner solution is specifically formulated for ultrasonic machines, but that doesn't make every piece machine-safe. Avoid using it on pearls, opals, and soft or porous stones unless tested first.
Ammonia isn't a safer fallback for unknown costume jewelry. It can harm delicate finishes and adhesives, and it's hazardous to mix with bleach. Avoid chemical dips, acetone, alcohol, chlorine, bleach, and other strong cleaners unless a manufacturer or conservator has confirmed that they're compatible with the specific piece.
Practical rule: An ultrasonic step comes only after the piece has passed inspection and you've confirmed that its materials are suitable.
For more guidance on equipment limits, see this explanation of whether an ultrasonic cleaner is suitable for all jewelry.
Fix Green, Black and Dull Results
Green marks usually point to exposed copper- or brass-colored base metal, not grime that needs harder scrubbing. The symptom helps you decide whether to clean, rinse, dry, or stop.
| Symptom | Likely cause | Fix |
|---|---|---|
| Green marks on the metal or on skin | Copper or brass base metal exposed through worn plating | Stop wearing it if skin reacts. Dry and store it, and don't scrub harder. |
| Dark film that returns within weeks | Sulfur gases in the air reacting with silver | Clean gently again and store it in a dry, low-pollution enclosure. |
| Dull haze right after cleaning | Detergent residue left on the surface | Wipe with a water-dampened swab and dry thoroughly. |
| Dark grime inside stone settings | Trapped oils and dirt in recesses | Use a cotton swab with minimal liquid, one small area at a time. |
| Patchy result after an ultrasonic cycle | Heavy tarnish needing more than one cycle | Repeat one cycle only if the piece is confirmed safe for ultrasonic cleaning, then inspect it. |
| Cloudy coating or flaking layer | Plating or coating failure | Stop cleaning and take the piece to a professional. |
A freshly cleaned surface can tarnish again when it's exposed to the conditions that caused the change in the first place. That doesn't mean the cleaning failed. Keeping the piece dry and limiting exposure to skin oils can help slow the return.
If a dull haze appears immediately, look for soap film before reaching for polish. A clean swab dampened with water can remove residue; dry the area right away. For dark dirt in a setting, touch only the accessible recess with a barely damp swab, and stop if the stone moves or the surrounding finish changes.
A patchy appearance after a machine cycle isn't a reason to switch to a stronger chemical. Inspect the piece first, and repeat a cycle only if the materials are confirmed compatible. If the only apparent fix is abrasion or a stronger chemical, stop and get professional advice.
Store and Wear Cleaned Pieces Safely
Store each piece dry and separate from the others. A soft pouch or individual bag with a desiccant pack can help limit moisture, while separate storage reduces scratches from jewelry rubbing together. Keep pieces away from humid bathrooms and other damp areas.
Put jewelry on after applying lotion, perfume, and hair products, and remove it before those products or moisture can leave residue on the surface. Nitrile gloves can help keep freshly cleaned metal free of fingerprints and other contamination. Avoid chlorine-processed gloves, which can tarnish silver.
Cleaning doesn't remove nickel from an alloy, and a worn finish may expose metal that was previously covered. The DermNet guide to nickel allergy notes that necklaces, earrings, bracelets, rings, and clips may contain nickel, which can cause dermatitis in people who are allergic to it. A cotton-bud reaction can indicate nickel, but it isn't a medical diagnosis.
Stop wearing a piece that causes itching, redness, blistering, or persistent irritation, and seek medical advice rather than cleaning it repeatedly. A professional can assess a suspected allergy. If your skin reacts, don't wear the piece, however good it looks.
Decide Between Home Cleaning and a Professional
Home cleaning makes sense only when the piece is sturdy enough for the method you've chosen. Proceed when all the relevant checks are reassuring:
- Mostly solid metal: The piece appears sturdy and doesn't have vulnerable mixed materials.
- Finish intact: You don't see peeling, flaking, or exposed base metal where a surface layer should be.
- No glue or enamel: The components can tolerate the small amount of moisture involved.
- Test swab stays clean: The hidden test doesn't pick up color or alter the finish.
- Skin reacts to nothing: Wearing the piece hasn't caused irritation.
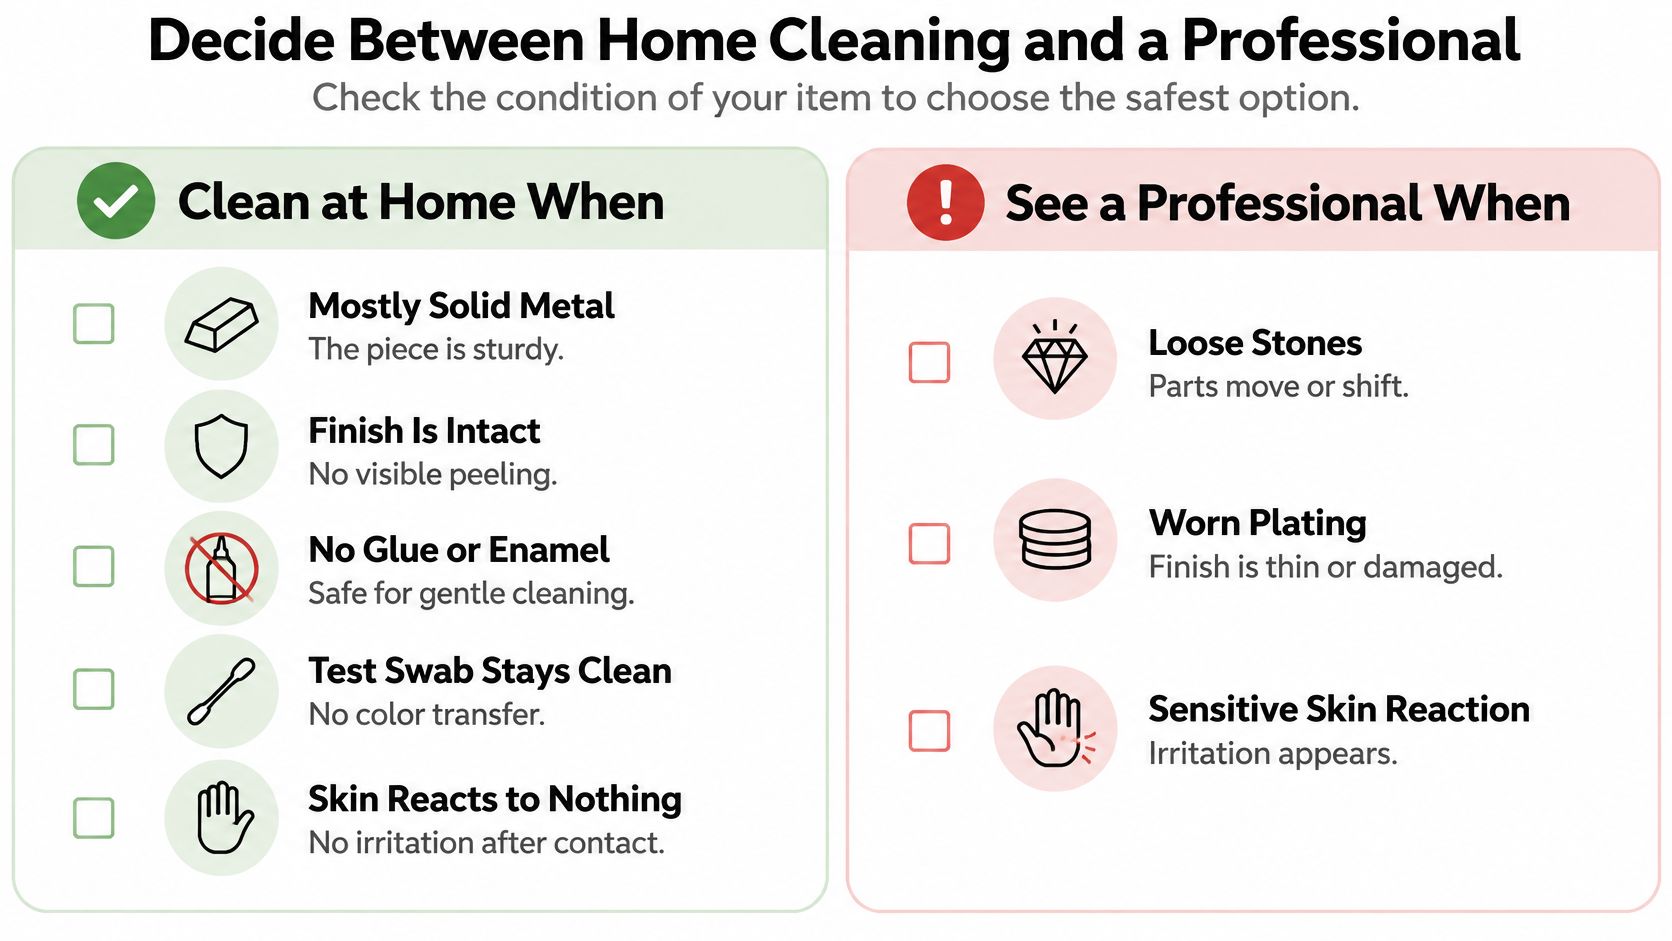
Choose a professional instead if stones are loose, enamel is cracked, plating flakes, or the piece combines metal with pearls or fabric. A piece with sentimental or high value also deserves an assessment before cleaning, especially if its materials or finish are uncertain. A professional can help identify whether it needs repair rather than surface cleaning.
A middle case is a piece that passes the swab test but still has heavy tarnish. Consider an ultrasonic cycle only if it's a confirmed compatible, solid-metal piece without glue, enamel, pearls, fabric, or fragile stones. Check the solution label against the piece's material, and don't test a delicate stone by exposing the whole item to a method that could harm its other components.
The cleaner's concentrate allows up to approximately 36 cleaning sessions per bottle, and the Jewelry Cleaner costs $12.99. Those product details don't change the material checks: a cleaner that works for suitable jewelry still isn't a safe choice for every costume piece.
Clean the piece only when it passes inspection and matches the method you've chosen.
Evo Dyne Products offers jewelry care solutions, including an ultrasonic jewelry cleaner solution for dirt, oils, and light tarnish. If your piece is confirmed compatible and you want a cleaner formulated for ultrasonic machines, explore Evo Dyne Products and choose an approach that fits the jewelry's materials.