


You pull a brass ring or pendant out of a drawer expecting warm gold color, and instead you get a cloudy surface, dark recesses, maybe a green streak where it sat against skin. That's the moment the piece gets worse. They grab a rough cloth, an old toothbrush, lemon, vinegar, baking soda, whatever is closest, and start scrubbing before they've figured out what kind of brass piece they're holding.
That's the wrong order.
To clean brass jewelry well, you need to match the method to the piece. Solid brass can usually take more work. Brass-plated jewelry often can't. Stone-set pieces have their own risks. Patinated brass may already look exactly the way it was meant to look, and “restoring shine” can strip the character right off it. The wear environment matters too. A cuff worn in a dry office doesn't age the same way as a ring worn through sweat, sunscreen, and humid air.
The Brass Piece You Pulled Out Is Not What It Used to Be
A brass piece rarely comes out of storage looking exactly the way it went in. A pendant left unworn for months often turns hazy first. Then the low spots darken. Then you notice green in a chain link or under a clasp, and now it looks less like jewelry and more like a problem.
Most of that disappointment comes from assuming the piece is dirty when it's reacted.
What you're usually seeing
Brass doesn't just collect grime. It changes at the surface. Sometimes the change is light and even, which can look attractive on a cuff or signet ring. Sometimes it's blotchy, skin-reactive, and ugly. Those are different situations, and they need different levels of cleaning.
A few common bench-side scenarios:
- The solid brass cuff: dull all over, darker at the edges, but still structurally sound.
- The plated fashion ring: bright on top, worn thin on the band, already showing a different tone underneath.
- The stone-set pendant: clean enough on the face, but packed with residue around the setting.
- The antique-look earring: dark recesses that may be intentional, not damage.
Practical rule: If you don't know whether a finish is intentional, start with dirt removal only. You can always clean more. You can't un-strip plating or rebuilt patina with a kitchen remedy.
The first mistake people make
They treat every piece like raw metal.
That's how plating gets rubbed through, lacquer gets stripped, and glued elements loosen. Brass is fairly forgiving when the piece is solid and plain. It's much less forgiving when the surface is thin, coated, assembled, or deliberately aged.
What works is a simple triage:
- Identify the piece type
- Look at where the discoloration sits
- Choose the least aggressive method that fits the problem
If the brass still feels smooth and the discoloration sits on top, you're probably dealing with removable surface tarnish. If the metal looks rough, porous, flaking, or pitted, you're not just cleaning anymore. You're trying not to expose damage further.
That's the goal here. Not to make every piece look factory-new, but to clean brass jewelry without removing the finish, detail, or structure that made it worth keeping.
Why Brass Tarnishes in the First Place
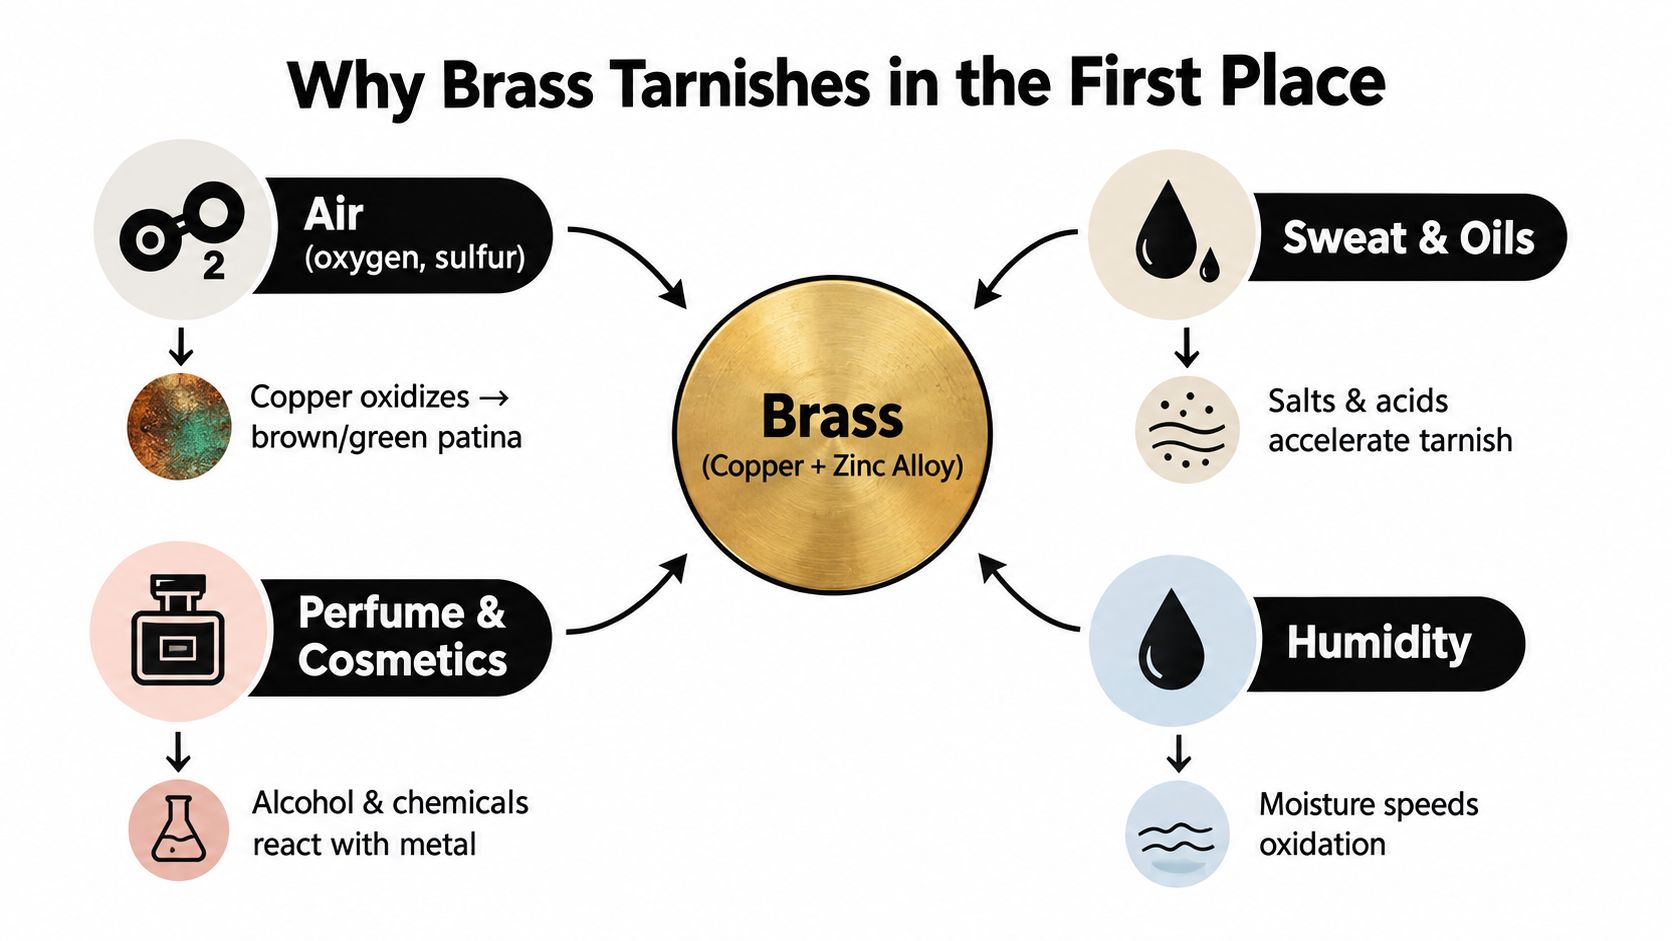
Brass is not a pure metal. It's a copper-zinc alloy, and the copper content is what drives most visible tarnish. In jewelry-grade brass, a commonly cited composition runs from roughly 55% to 95% copper and 5% to 45% zinc, with C26000 cartridge brass often around 70% copper and 30% zinc. When that copper meets oxygen, moisture, sulfur compounds, and skin acids, it forms dark copper oxides and sometimes greenish copper carbonate or copper sulfide layers, which is why cleaning often means removing corrosion film rather than simple dirt (brass alloy composition and tarnish behavior).
What actually speeds it up
The chemistry matters, but the wear environment matters just as much.
Brass darkens faster when it sits in humid air, when it stays damp after wear, and when it picks up residue from skin, cosmetics, or polluted air. One modern accelerated test cited for brass and related copper alloys reported visible darkening and patina within 24 to 72 hours at humidity above 40% relative humidity when airborne hydrogen sulfide is present (accelerated tarnish conditions for brass alloys). That sounds extreme, but it explains why a piece can look fine one week and blotchy the next if it lived in a bathroom, gym bag, or travel pouch.
The worst offenders are usually:
- Sweat and skin acids: especially on rings, cuffs, and chain clasps
- Perfume and cosmetics: they leave films that hold moisture against the metal
- Humid storage: drawers near showers, windows, or laundry areas
- Sulfur in the air: enough to darken brass quickly under the right conditions
Tarnish isn't always damage
A thin dark film is usually reversible. Deep corrosion isn't.
If the surface is only discolored, careful cleaning can bring back a lot of the original tone. If the brass has gone rough, crusty, or pitted, that's a different problem. Cleaning may improve the look, but it won't rebuild metal that has already been lost.
Dark color in a recess isn't automatically a flaw. On patinated brass, it may be the finish. On a neglected ring band, it may be trapped corrosion. Location tells you a lot.
That's why aggressive polishing is often the wrong first move. You need to know whether you're lifting residue, removing tarnish, or grinding away a surface that was meant to stay there.
DIY Cleaning Methods Ranked From Safest to Riskiest
Most household methods can work. The problem is that people use a strong method on the wrong piece, then assume the method failed when the issue was fit. The safest routine for a solid brass cuff isn't the safest routine for a plated charm bracelet.
Start with the gentlest option
For routine dullness, mild dish soap in warm water is still the baseline. It removes skin oil, dust, and loose residue without forcing an acid reaction. That makes it the right starting point for nearly every piece, especially if you haven't identified the finish yet.
After that, the common DIY options get progressively more useful and more risky.
DIY Brass Cleaning Methods Compared
| Method | Best For | Contact Time | Risk Level |
|---|---|---|---|
| Mild dish soap and warm water | Routine film, sweat, skin oil, light dullness | Short wash | Low |
| Lemon juice with baking soda | Moderate tarnish on solid brass | Brief spot application | Medium |
| Vinegar-and-flour paste | Heavier oxidation on solid, undecorated brass | Short, closely watched application | Higher |
| Ketchup | Light tarnish when nothing else is available | Brief surface contact | Higher than people expect |
What each method really does
Dish soap and warm water
This is the safe first pass. It won't erase deep tarnish, but it often removes enough grime to show you what the metal needs. Use it on solid brass, plated brass, stone-set pieces, and patinated pieces when the goal is cleaning, not brightening.
Lemon juice with baking soda
This can lift moderate tarnish on solid brass, but it combines acid with abrasion. That means it can brighten fast and over-clean just as fast. Keep contact short, work only where needed, and skip it on thin brass, plated pieces, or finishes you want to preserve.
Vinegar-and-flour paste
Effective on heavier oxidation, especially on plain solid brass with no stones, no coating, and no darkened finish worth saving. It's risky because it stays put, creeps into crevices, and can leave residue if you don't clear it completely. I wouldn't use it on plated brass, lacquered pieces, or mixed-material jewelry.
Ketchup
People love this trick because it's in the fridge. I rank it last. It's acidic, sticky, and messy in settings and chain links. It can work on light tarnish, but it's sloppy compared with a controlled cleaner. If you're comparing options before trying pantry chemistry, this guide on how to remove tarnish gives a cleaner decision path.
If a DIY method needs scrubbing to “make it work,” the chemistry probably isn't the problem. The piece type is.
The simplest ranking
- Safest overall: soap and water
- Best for plain solid brass with visible tarnish: lemon and baking soda, used sparingly
- Strong but easy to misuse: vinegar paste
- Most overrated: ketchup
That ranking changes the moment plating, stones, lacquer, or intentional patina enter the picture.
The Foolproof At-Home Routine That Works Every Time
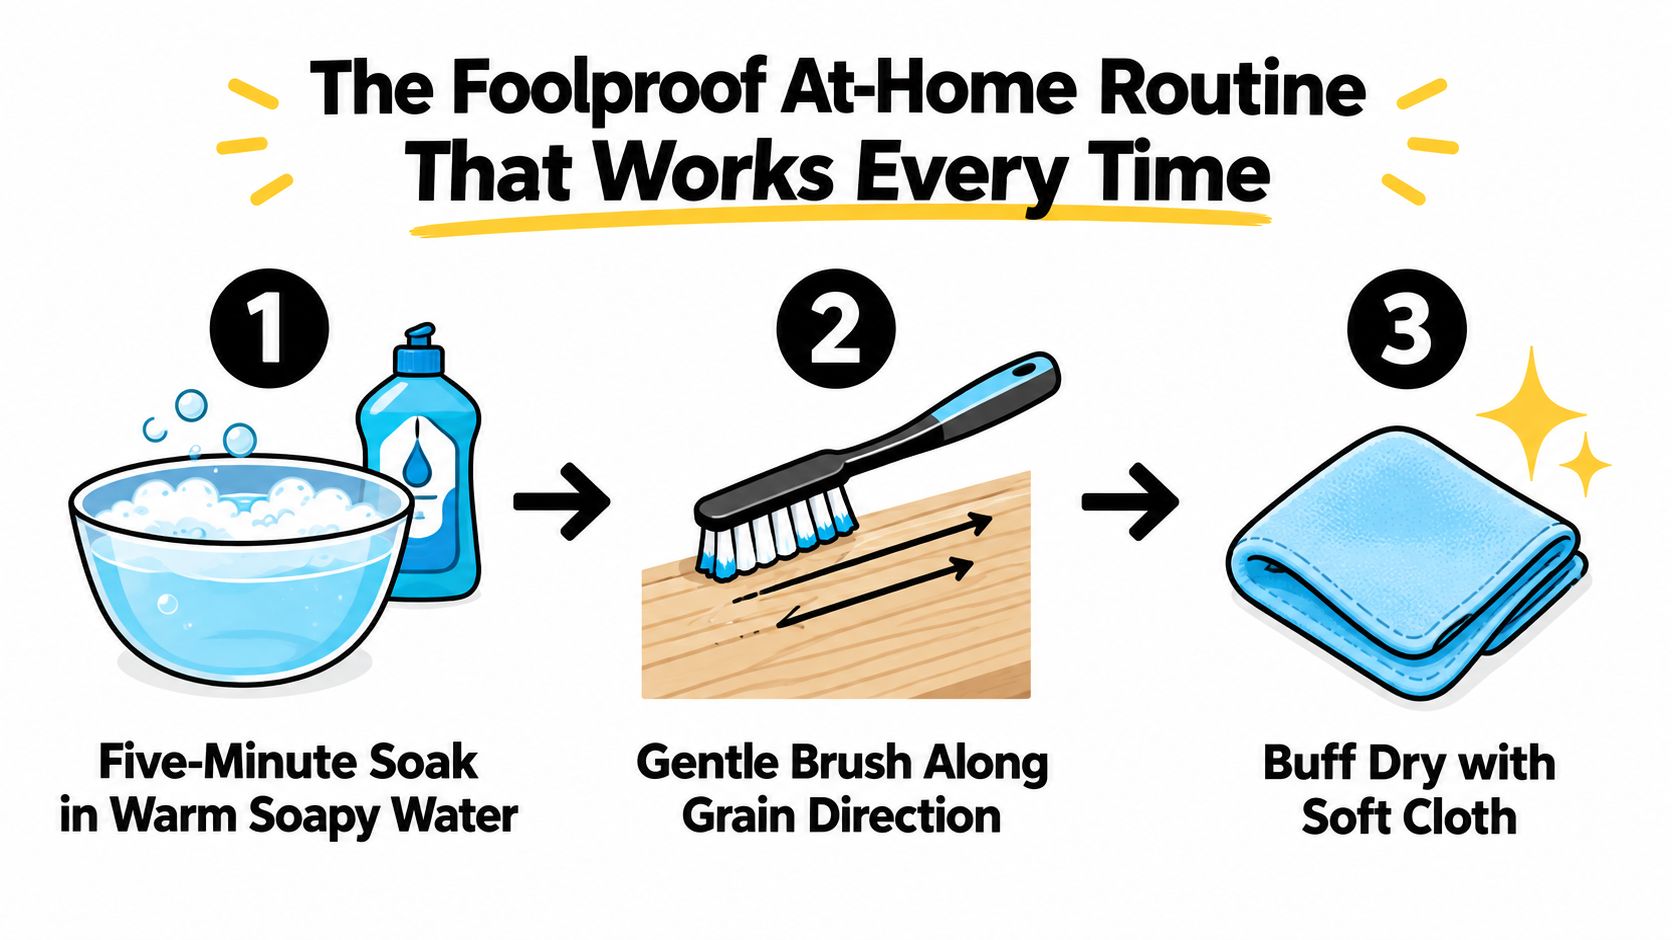
If you only keep one cleaning routine for brass jewelry at home, keep this one. It handles ordinary wear safely and tells you whether the piece needs anything stronger. On a lot of jewelry, it's enough by itself.
Start with the visual guide, then use the details below.
The routine
Use lukewarm water, not hot, and a pH-neutral, fragrance-free dish soap. If the piece has loose stones, fragile joints, or obvious plating loss, shorten the wet time and work more carefully.
-
Soak briefly
Give the piece a short soak in warm soapy water. The point is to soften skin film and loosen dirt, not to marinate the metal. -
Brush gently
Use a soft-bristled toothbrush or similar soft brush. Work with light pressure. The bristles should bend a little, not flatten. On brushed or directional finishes, move with the grain instead of scrubbing in circles. -
Lift residue from crevices
If you see green buildup in corners or engraving, use a soft wooden toothpick. Not metal. Metal tools scratch brass fast and leave sharp-looking bright lines.
Here's a helpful visual walkthrough before you start brushing:
Rinse and dry correctly
A lot of home cleaning jobs go wrong here. Residue left on brass can spot it.
Museum conservation guidance for brass recommends a stepwise approach: dry brushing first for loose debris, then solvent-assisted cleaning for greasy residues, while avoiding re-depositing grit into details. It also warns that brass can stain if cleaning residue is left behind, so the object should be fully cleared of solution and dried immediately after treatment (museum brass cleaning guidance).
For home care, the practical version is simple:
- Rinse thoroughly: don't leave soap in chain links, stampings, or bezels
- Towel-dry immediately: blot first, then wipe
- Air-dry on a lint-free cloth: only after surface water is already removed
- Buff with microfiber: use straight, overlapping strokes
How to tell when this is enough
If the brass comes out cleaner, warmer in tone, and evenly dull rather than blotchy, stop there. That means the problem was mostly surface film and light oxidation.
If the piece still looks dark in broad areas after drying, then you're dealing with actual tarnish, not just grime. That's when a more targeted tarnish-removal step makes sense. Not before.
Clean brass jewelry in stages. First remove what sits on the metal. Then decide whether you need to remove what the metal became.
Ultrasonic Cleaners and Commercial Tarnish Removers
An ultrasonic cleaner can be useful. It can also chew up the wrong brass piece faster than a hand method ever would. Same for commercial tarnish removers. The product category matters less than the fit.
When ultrasonic cleaning makes sense
Independent jewelry-care guidance for ultrasonic systems limits intensity for brass and similar pieces to a mild solution in warm water, roughly 50 to 60°C, and short cycles of about 3 to 10 minutes, with some advice going shorter for delicate or stone-set jewelry. The reason is straightforward: ultrasonic cavitation pulls grime from crevices, but long exposure or aggressive chemistry can dull finishes, loosen components, and accelerate visible damage. One jewelry-focused technical source reported 73% of tested pieces showed visible pitting after a single 3-minute ultrasonic cycle, which is why ultrasonic cleaning is not a universal safe option for brass jewelry, especially plated, patinated, or assembled pieces (ultrasonic cleaning risks and pitting benchmark).
That benchmark matters in plain language. If a piece already looks fragile, porous, thinned, flaking, or worn through, don't put it in an ultrasonic tank.
A workable rule for ultrasonics
Use an ultrasonic cleaner only when all of these are true:
- Solid brass: not plated brass
- No stones that depend on glue
- No intentional dark patina you want to preserve
- No loose parts, no soft enamel, no failing finish
- Mild solution only, short cycle only
If you use a jewelry-specific ultrasonic solution, keep it mild and follow the shortest effective cycle. Evo Dyne Products offers an ultrasonic jewelry cleaner solution for use in ultrasonic setups, which fits this category of tool-specific cleaning rather than hand polishing.
Cleaning Methods Compared for Brass Jewelry
| Method | Effectiveness | Risk to Plating | Risk to Patina | Best For |
|---|---|---|---|---|
| Ultrasonic cleaner | Strong on trapped grime | High if plating is weak | High | Solid brass with no stones or glue |
| Dip solution | Fast on brightening | Very high | Very high | Plain solid brass only, used cautiously |
| Cream polish | Good, controllable | Medium to high | High | Solid brass needing surface brightening |
| Waxy restoration cloth | Mild | Lower | Lower to medium | Light tarnish, coated pieces, maintenance |
Which commercial remover to choose
Dip solutions act fast, but they don't discriminate much. They can strip darkened finish and expose plating problems instantly.
Cream polishes are easier to control because you choose where they go. They're better for solid brass than for plated jewelry.
Waxy restoration cloths are the maintenance option. They're useful when the brass only needs a light refresh and you don't want wet chemistry reaching every crevice.
Avoid products with harsh or unclear acid blends. If a label doesn't tell you what it is, don't test it on jewelry you care about.
Plated, Patinated, and Stone-Set Brass Need a Different Plan
Most bad brass-cleaning advice comes from pretending every piece is raw, solid metal. It isn't. The finish decides the method.
Brass-plated pieces
Plated brass gets the gentlest treatment in the room. The outer layer is thin enough that repeated rubbing, acids, or polishing compounds can wear through it.
For plated jewelry, stick to:
- Short soap-and-water cleaning
- Soft cloth drying
- No abrasive pastes
- No lemon, vinegar, or ketchup
- No ultrasonic cleaning
If the plating is already thinning at edges or on the back, stop chasing shine. Clean it gently and accept that over-cleaning will only expose more base metal.
Patinated and lacquered brass
A dark antique finish is often deliberate. If you polish the high spots and strip the recesses, the piece can end up looking flat and fake.
Clean patinated brass by removing dirt only. Use a soft cloth, mild soap if needed, and a careful brush around detail. Don't use brightening pastes unless you want the patina gone. Lacquered brass is similar. If the clear coating is intact, polishing the metal itself isn't the job. Washing and drying is.
Leave intentional darkness alone. Clean the grime around it, not the finish itself.
Stone-set and mixed-material jewelry
Stone-set brass is where kitchen chemistry causes the most collateral damage. Porous stones, soft adhesives, and trapped residue don't mix well with acidic or soaking methods.
Use a restricted approach:
- Porous or delicate stones: keep moisture minimal and avoid soaking
- Glued settings: skip ultrasonic cleaning and long wet exposure
- Prong-set stones: safer than glued, but still don't flood the setting
- Mixed metals: stay with pH-neutral cleaning to avoid uneven reactions
If you want a visual sense of how different handcrafted pieces combine finishes, textures, and materials, these examples of handcrafted accessories are useful because they show exactly why one cleaning method doesn't fit every design.
The short decision rule is simple. Solid plain brass can take more. Plated brass gets almost nothing. Patinated brass gets preservation, not brightening. Stone-set brass gets spot cleaning, not soaking.
Storage and Prevention So You Clean Less Often
Cleaning matters. Storage matters more. Most brass doesn't tarnish because people failed to polish it. It tarnishes because they put it away damp, exposed, or coated in skin and product residue.
A useful care approach is to match maintenance to wear conditions. Recent care guidance has started moving away from one-size-fits-all timing and toward more frequent wiping for heavy wear or humid climates, with specific warnings about perfume, sunscreen, bug spray, and similar exposures (care cadence for humid climates and heavy wear). That's the right direction.
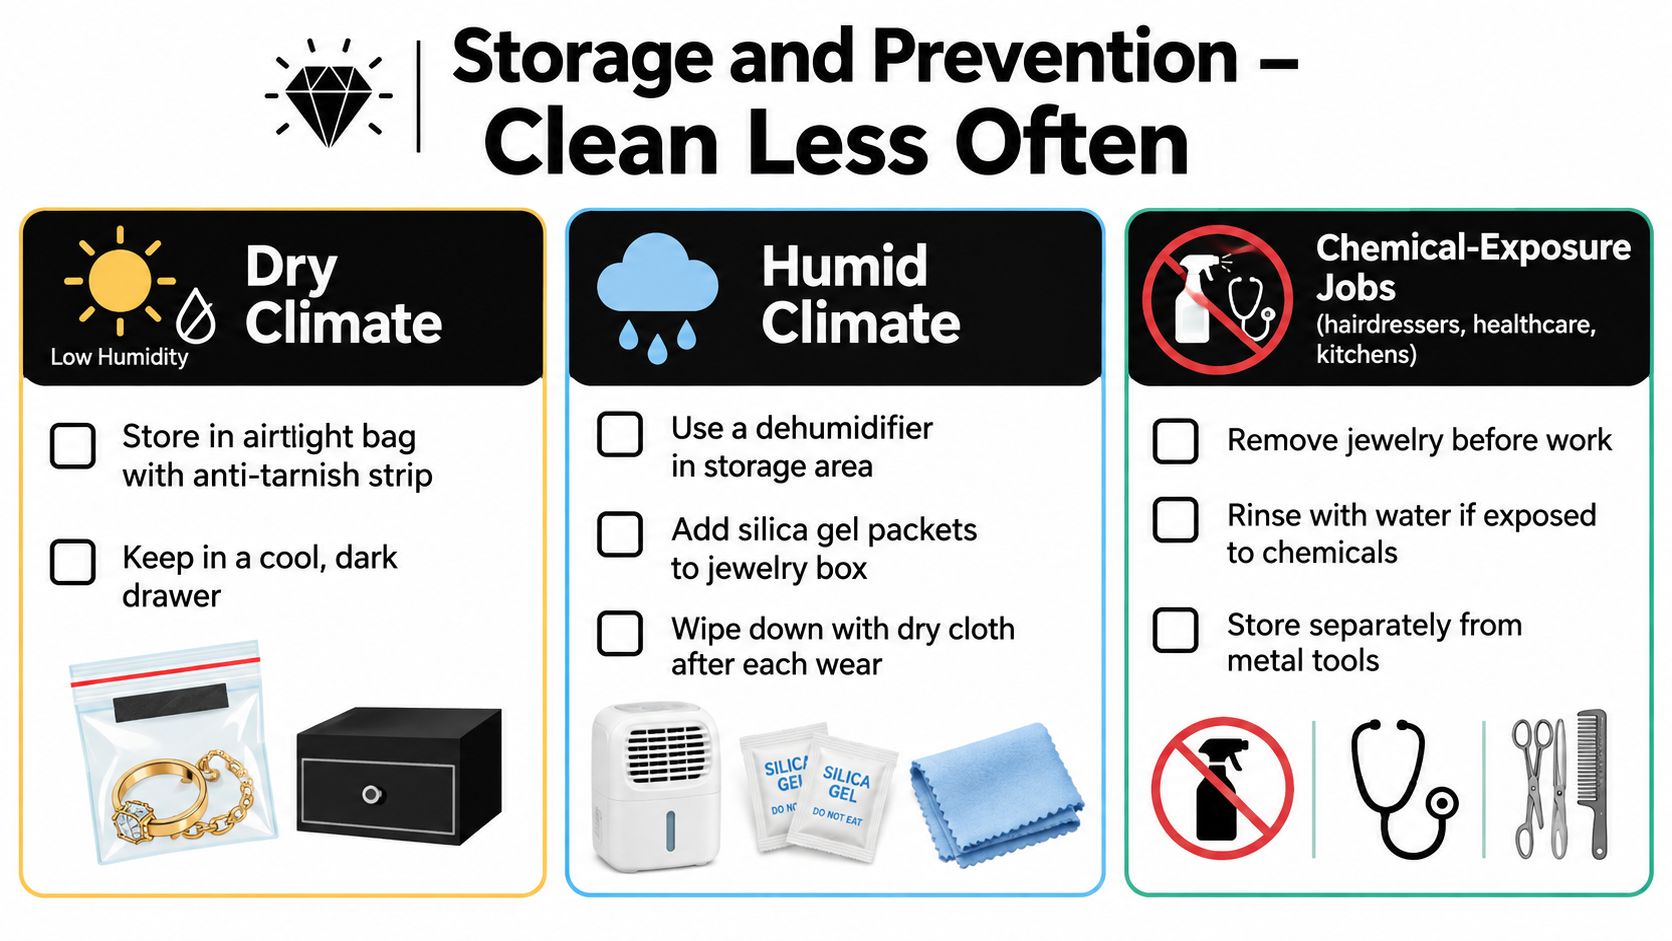
Match storage to the environment
Dry climate
You can usually get away with simple storage. Keep brass separate so pieces don't scratch each other, and wipe off skin oil before it goes back into the box.
Humid climate
Humidity speeds everything up. Use sealed bags or a tighter jewelry box, add anti-tarnish material or moisture control, and never store a piece even slightly damp.
Chemical-exposure jobs
If you work around sprays, sanitizers, hair product, cleaners, or food prep, don't wait for the jewelry to look bad. Wipe it after wear every time. Remove it before heavy exposure when you can.
Habits that prevent most repeat tarnish
- Wipe after wear: especially rings, cuffs, and chains worn against skin
- Store pieces separately: brass scratches more easily than people think
- Keep jewelry out of bathrooms: steam and moisture accelerate discoloration
- Put jewelry on last: after perfume, lotion, and sunscreen
- Dry immediately after contact with moisture: even if it was only a sweaty afternoon
Optional sealing for solid brass
If you've cleaned a solid brass piece back to bright metal and want to slow down repeat tarnish, you can apply a thin protective barrier such as jewelry lacquer or microcrystalline wax. This is optional on raw brass, but it's useful for daily-wear pieces if you prefer a brighter look over natural aging.
Use sealing only on clean, fully dry, solid brass. Don't apply it over grime, and don't use it as a shortcut for plated pieces that are already failing.
A practical cadence:
- Light-wear pieces: occasional buffing and periodic resealing
- Daily-wear rings or bracelets: regular wipe-downs, routine soap cleaning, deeper attention when they stop brightening with the basic method
If prevention fails, read the tarnish pattern. Broad dullness usually needs the basic wash routine again. Dark film on solid brass may need a stronger targeted method. Green buildup in tight recesses means you need careful detail cleaning, not a harder scrub.
Evo Dyne Products offers practical care solutions that fit this kind of maintenance work, including ultrasonic jewelry cleaner solutions for pieces that are appropriate for machine cleaning. If you want a bench-minded option for ongoing jewelry care and other cleaning needs around the house, visit Evo Dyne Products.
