


You open your jewelry box and find a sterling silver chain that looked brilliant when you bought it. After months of disuse, it's dull, yellowish-brown, or nearly black. Reaching for the strongest sterling silver tarnish remover seems logical, but that's how stones loosen, plating disappears, patina gets stripped, and abrasive marks appear.
The right method depends on what the piece is made of, how severe the tarnish is, and whether it includes stones, plating, oxidation, or adhesive. Light tarnish on a plain chain needs a different treatment from heavy blackening on an engraved pendant or a silver ring holding an opal.
Why Sterling Silver Tarnishes in the First Place
Sterling silver isn't pure silver. It's an alloy containing 92.5% silver and 7.5% other metal, commonly copper, as described in John Hardy's sterling silver care guide. Copper strengthens silver enough for daily jewelry, but it also makes the alloy more reactive than fine silver.
The dark coating isn't ordinary dirt. Conservation research identifies it mainly as silver sulfide, Ag2S, while sterling silver can also develop copper sulfide, Cu2S, because copper is part of the alloy. Sulfur-containing gases, especially hydrogen sulfide, can trigger tarnish at extremely low concentrations, reported in parts per billion, so ordinary indoor air can darken stored jewelry over time. The chemistry and removal categories are discussed in comparative conservation research on silver tarnish cleaning.
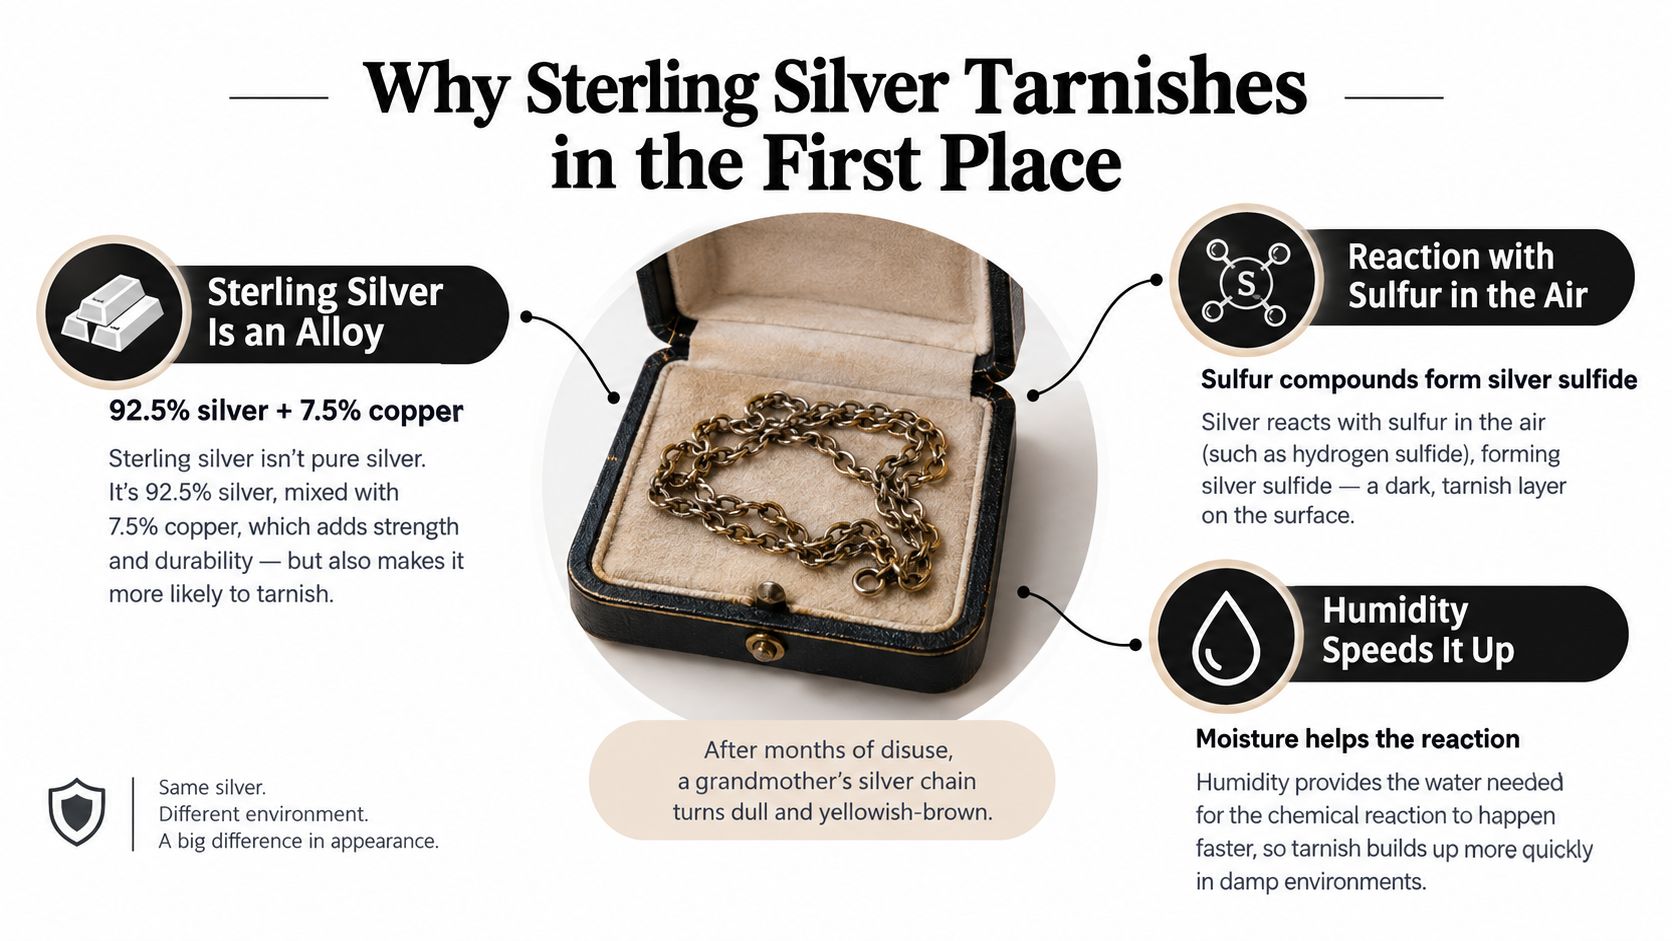
What speeds up the reaction
Humidity supplies moisture, while sulfur compounds come from air pollution and common materials around the home. Perspiration, cosmetics, perfume, rubber bands, wool, eggs, onions, and household chemicals can all create conditions that darken silver faster. Coastal air and polluted urban environments can be especially demanding, but a jewelry box inside a normal home isn't chemically inert.
Tarnish is surface-level corrosion, not the same as the silver disappearing or the piece becoming structurally unsound. Removing it restores the appearance, but every aggressive abrasive treatment can remove a small amount of the underlying metal. That's why conservation guidance treats polishing, chemical dips, and electrochemical reduction as separate preservation methods rather than interchangeable cleaning tricks, as explained by the Canadian Conservation Institute.
Practical rule: Identify the vulnerable part of the jewelry before choosing the remover. The silver may tolerate a treatment that a pearl, glued stone, plated surface, or intentional patina cannot.
Choosing the Right Sterling Silver Tarnish Remover
There isn't one universal winner. Ultrasonic cleaning, commercial products, and aluminum-foil reduction each fit a different type of piece. A plain, durable chain gives you more options than a silver pendant with an opal and a glued setting.
| Method | Best For | Avoid On | Time Required |
|---|---|---|---|
| Ultrasonic cleaner | Plain chains, solid rings, durable hard-stone pieces | Pearls, opals, porous stones, glued parts, hollow pieces | Short cycle |
| Commercial dip | Uniform tarnish on solid, unplated silver | Mixed materials, patina, delicate finishes | Brief immersion |
| Foaming polish or cream | Moderate to heavy tarnish on accessible silver | Soft stones, plated surfaces, recessed patina | Several minutes |
| Aluminum-foil reduction | Plain sterling with light to moderate tarnish | Stones, adhesives, plating, intentional oxidation | A few minutes |
| Soft polishing cloth | Light tarnish and routine touch-ups | Deep recesses and heavy blackening | A few minutes |
Match the method to the piece
Ultrasonic cleaners use cavitation to lift contamination from crevices that a cloth can't reach. They're useful for plain chains, class rings, and intricate filigree, but only when the piece has no vulnerable stones or glued components.
Commercial dips and foaming polishes work through chemical action or controlled surface cleaning. Conservation testing has identified effective formulations including thiourea at 8% w/w, formic acid at 10% v/v, DTPA pentasodium salt at 10% w/w with Triton X-100 at 1.5% v/v, and EDTA at 10% w/w. Those findings show why product chemistry matters, but they don't make every dip safe for every finished piece.
DIY reduction with hot water, baking soda, and aluminum foil is inexpensive and avoids polishing away metal. It's most sensible for plain sterling with light tarnish, not for an heirloom with stones, plating, or deliberate dark detail.
If you're inspecting a contemporary sterling design before choosing a cleaner, Fountainhead New York's jewelry collection offers a useful reminder that silver jewelry can include shaped surfaces, hardware, and details that need more than a one-size-fits-all treatment.
Pearls, opals, turquoise, glued settings, and rhodium-plated surfaces deserve a jeweler's evaluation before immersion or ultrasonic cleaning. For the correct method, start with the equipment and restrictions below.
How to Use an Ultrasonic Jewelry Cleaner Safely
An ultrasonic cleaner is excellent at reaching links, grooves, and filigree, but it isn't a magic tank. Cavitation can loosen weak settings, expose cracks in stones, and force solution into hollow or glued components. Use it on plain, structurally sound sterling silver, or on pieces with hard, non-porous stones that a jeweler has confirmed are secure.
Set up the bath correctly
- Choose the solution. Use a silver-safe ammonium-based solution or a neutral-pH concentrate intended for jewelry. Dilute concentrate at roughly 1:10 with distilled water, following the product label if it specifies a different ratio. Distilled water reduces mineral spotting.
- Prepare the temperature. Bring the bath to about 50°C, or 122°F. This provides energetic cleaning without treating heat as a substitute for inspection.
- Load the basket. Put each piece in the basket with space between items. Keep jewelry away from the tank walls and bottom. Contact during vibration can cause scratches, bends, or damage to delicate findings.
- Run a short cycle. Start with 3 to 6 minutes. Longer isn't automatically better, especially when prongs, hinges, or thin links are involved. Inspect the result before repeating a cycle.
- Rinse and dry. Rinse the jewelry with distilled water, then dry it immediately with a lint-free cloth. Solution left in crevices can leave residue or contribute to rapid dulling.
Keep these items out
Never place pearls, opals, turquoise, lapis, malachite, amber, coral, watches, hollow chains, or glued components in the ultrasonic bath. Porous materials can absorb liquid, hollow pieces can trap solution, and adhesive bonds can fail during submersion or vibration.
Inspect before cleaning. If a stone moves, a prong catches on fabric, or a hollow chain has a damaged seam, stop and use a jeweler instead. An ultrasonic cleaner can remove tarnish and buildup, but it can't repair a weak setting.
Ultrasonic cleaning is a tool for access, not permission to ignore construction. If the piece contains a vulnerable material, clean the silver surface locally instead.
Commercial Dips, Polishes, and DIY Reduction Methods
Commercial sterling silver tarnish removers fall into three practical families: liquid dips, creams or pastes, and treated wipes. Each uses a different balance of speed, chemical action, and physical effort.
Liquid dips are fastest on plain chain, smooth rings, and solid pieces with even tarnish. Follow the label, keep immersion brief, rinse completely, and dry immediately. Dips can leave chemical residue in links, engraving, and textured recesses, and they can strip patina or attack non-silver components.
Creams and pastes give you more control. Apply a small amount with a soft cloth, work in the direction of the metal's finish, and buff away the residue. They're useful for heavier tarnish on broad, accessible surfaces, but repeated pressure can remove metal and alter a high-polish finish. A comparative evaluation of commercial silver polishes found that foam and cloth products were mainly effective on light tarnish, while calcium carbonate handled thicker tarnish with added pressure and repeated strokes. The same evaluation cautioned that silicon rubber was aggressive and should be reserved carefully for thicker layers, as reported in the Journal of the American Institute for Conservation.
Wipes are convenient for travel and quick maintenance. They're not the right answer for deep blackening, recessed designs, or residue hidden between links.
The aluminum-foil reduction method
The classic method reverses the sulfide reaction rather than scrubbing the coating away. The core reaction is 3 Ag2S + 2 Al -> 6 Ag + Al2S3, documented in research on aluminum reduction for silver tarnish.
Use it only on plain, unplated sterling without stones, adhesives, patina, or porous surfaces:
- Line a glass or ceramic bowl with aluminum foil, shiny side up.
- Add 1 tablespoon of baking soda per cup of very hot water.
- Add 1 teaspoon of salt if desired.
- Submerge the silver so it touches the foil.
- Wait 1 to 3 minutes, checking the piece rather than leaving it unattended.
- Remove it with tongs, rinse thoroughly, and dry completely.
The Royal Society of Chemistry notes that light tarnish can disappear within a few minutes with the hot-water, baking-soda, and foil method, while badly tarnished pieces may need several treatments. Use this approach for plain silver only. It can remove intentional oxidation and may behave unpredictably on mixed tarnish layers.
| Method | Best For | Time Required | Risk to Mixed Pieces | Cost Per Use |
|---|---|---|---|---|
| Liquid dip | Plain, evenly tarnished silver | Brief immersion | High | Purchased product |
| Cream or paste | Heavy tarnish on open surfaces | Several minutes | Moderate to high | Purchased product |
| Treated wipe | Light tarnish and travel touch-ups | Minutes | Moderate | Purchased product |
| Foil reduction | Plain sterling without vulnerable details | A few minutes | High | Household supplies |
| Soft cloth | Light tarnish and routine care | Minutes | Lowest, if used gently | Reusable tool |
Whatever method you choose, test a hidden area first, work in ventilation with gloves, rinse thoroughly, and dry with a lint-free cloth. Use gentle products for light tarnish. Reserve stronger chemistry or sustained polishing for heavy blackening on compatible solid silver.
Cleaning Mixed-Material Pieces Without Damage
The silver usually isn't the limiting factor. The stone, plating, adhesive, enamel, or decorative finish determines how much cleaning the piece can safely tolerate.
Start by sorting the jewelry according to its non-silver components. A plain sterling bangle can withstand a more direct approach, while a marcasite brooch or opal pendant needs local cleaning and restraint.
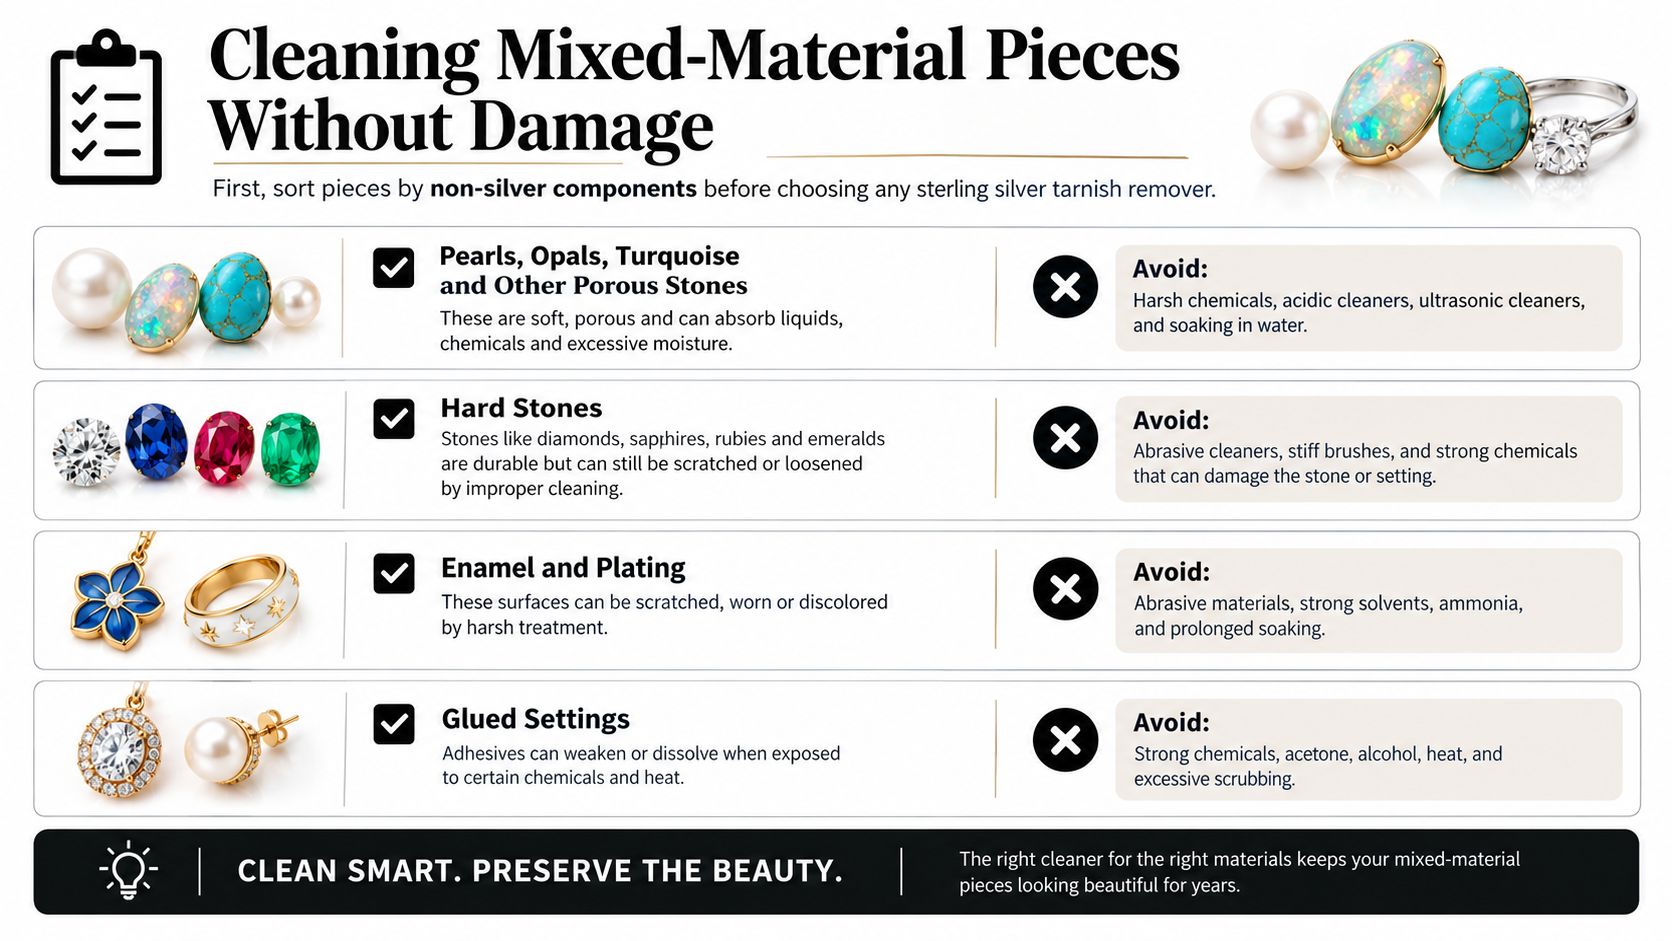
Use the material as your decision filter
- Pearls and porous stones: Pearls, opals, turquoise, lapis, amber, and similar materials shouldn't contact dips, pastes, or foil reduction. Wipe the silver carefully with a barely damp cloth, then dry the piece immediately.
- Hard stones: Diamonds, sapphires, rubies, and moissanite are more resistant to brief cleaning, but secure settings still matter. Avoid temperature extremes and inspect prongs before using an ultrasonic cycle.
- Plating and enamel: Check hallmarks and construction. A thin silver layer over base metal can strip under aggressive polishing, and home cleaning won't restore the missing layer. Use a soft cloth and accept a less dramatic shine rather than exposing the base metal.
- Patina and oxidation: Intentional darkening in recesses, common on artisan and Bali-style jewelry, can disappear in a dip. Avoid chemical immersion, or isolate the bright silver with a cotton swab and work locally.
- Adhesive-set components: Marcasite, costume-style sterling, and some watch cases use adhesive. Don't submerge them. Clean only the exposed silver with a damp cloth or soft brush.
Before any liquid treatment, check prongs, clasps, bails, and stone movement. Test the back of a pendant bail or another hidden spot. If anything shifts, stop.
Use the following visual guide alongside that inspection routine.
Preventing Tarnish With Smarter Storage and Habits
Cleaning should be the backup plan. Tarnish is usually reversible, but repeated aggressive polishing removes some underlying silver, and chemical treatments can threaten finishes or stones. The safest sterling silver tarnish remover is often the one you don't need because the piece was stored properly.
Tarnish requires sulfur compounds, oxygen, and moisture. Reduce contact with each one.
Build a dry storage routine
Store individual pieces in anti-tarnish bags or cloth pouches rather than letting chains and rings rub together. Add activated charcoal, silica gel packets, or an anti-tarnish strip to the storage area, and keep the box somewhere cool and dry. Chalk can also serve as a passive moisture and sulfur absorber in a jewelry box.
Bathrooms are poor storage locations because shower steam raises humidity. Keep silver away from rubber bands, wool, newspaper, and household cleaning supplies, all of which can contribute unwanted chemical exposure.
For long-term storage, seal the piece in a vacuum bag with a tarnish strip and reseal it after every inspection. Rotate pieces instead of compressing everything into one stack. Separation reduces scratching and gives chains, clasps, and textured surfaces room to remain dry.
Put jewelry on last, after lotion, perfume, sunscreen, hairspray, and makeup have dried. Remove it before swimming, exercising, showering, or household cleaning. Chlorine, sweat, steam, and cleaning chemicals all create conditions that increase the need for intervention.
Storage decision: Keep silver dry, separated, and isolated from sulfur-heavy materials. Prevention protects both the metal and the finish.
For a more detailed storage setup, use this guide to storing silver jewelry and choosing prevention tools. Good storage won't eliminate tarnish forever, but it makes cleaning less frequent and less aggressive.
Troubleshooting Common Sterling Silver Cleaning Problems
Most cleaning failures have a clear cause. Don't immediately reach for a stronger product when the first treatment looks uneven. Diagnose the residue, surface, and storage conditions before repeating the process.
| Problem | Likely Cause | Fix |
|---|---|---|
| Streaking or cloudy residue | Incomplete rinsing or hard-water spots | Rinse with distilled water and dry with lint-free microfiber |
| Pitting or micro-scratches | Excessive abrasive pressure or grit in the cloth | Switch to a fresh dedicated silver cloth and reduce pressure |
| Rapid re-tarnish | Moisture in crevices, polish film, or humid storage | Wash gently, rinse, dry fully, and store with an anti-tarnish strip |
| Dark patches in texture | Tarnish remains in recessed areas | Apply polish locally with a foam-tipped swab |
Fix residue before increasing strength
Cloudy streaks usually mean the product wasn't fully removed. Rinse again with distilled water, then dry with a clean lint-free microfiber cloth before liquid evaporates. Hard-water minerals can leave their own visible film, so don't mistake water spots for tarnish.
Pitting and fine scratches point to abrasion. A cloth that picked up grit can act like sandpaper, especially when you press hard across a polished surface. Use a fresh, dedicated silver-polishing cloth and test your pressure on the back of the piece first.
Rapid re-tarnishing often comes from trapped moisture, polish residue, or humid storage. Give the piece a mild dish-soap wash, rinse thoroughly, dry every crevice, and move it into a sealed storage pouch with an anti-tarnish strip.
Persistent dark patches in textured silver need precision, not a stronger soak. Use a foam-tipped swab with a small amount of commercial polish and work only in the affected recesses. Avoid flooding the whole piece, especially when the dark color is intentional oxidation.
Evo Dyne Products offers ultrasonic jewelry cleaner solutions for silver and a silver polishing cleaner designed to remove tarnish, dirt, and buildup. Visit Evo Dyne Products to compare jewelry-care options and choose a cleaner that matches your piece, finish, and cleaning method.
