

The usual advice to rub brass until it shines skips the most important question: should that surface be polished at all? A bright result isn't a good result if you've rubbed through plating, stripped historic lacquer, or flattened the detail on an heirloom.
Brass polishing cloths work well when their abrasion matches the finish. Start by identifying what you're touching, then choose the gentlest cloth that can do the job. Sometimes that means a treated polishing cloth. Sometimes it means plain cotton and leaving the darker surface alone.
Table of Contents
- Pick the Right Brass Polishing Cloth
- Finishes, Ultrasonic Cleaners and Safety Limits
- How to Prepare and Polish Brass Step by Step
- Polishing Jewelry, Fixtures and Instruments Differently
- Keeping Your Polishing Cloths Clean and Ready
- Troubleshooting Streaks, Scratches and Dull Spots
- Decide How Much Polishing Your Brass Needs
Pick the Right Brass Polishing Cloth
Buying the strongest cloth is a poor shortcut. A cloth that cuts through stubborn tarnish can also leave scratches that a softer cloth won't remove.
Brass is a copper–zinc alloy, and a treated cloth works through controlled mechanical abrasion, not by wiping dirt away. The History Nebraska copper-alloy care guide warns that aggressive abrasives and corrosive chemicals, including ammonia-containing products, can permanently damage delicate surfaces. Choose for the finish, not for the promise of maximum shine.
Brass polishing cloth types by abrasion and use
| Cloth type | Abrasion | Best use | Reference price (2025) |
|---|---|---|---|
| Untreated soft cotton or flannel | None added | Dusting lacquered and plated pieces | No reference price available |
| Plain microfiber | None added | Everyday wipe-down and light shine on coated brass | No reference price available |
| Single impregnated brass cloth | Fine abrasive compound | Light tarnish on solid, unlacquered brass | $6.00, listed by New Origin Shop for the Mahnal cloth in 2025 |
| Impregnated brass and copper cloth, 30 cm × 23 cm | Fine abrasive compound | Larger flat panels and fittings on solid brass | AU$36.60, listed by Double Bay Hardware for the Aussie Metal Care cloth in 2025 |
| Coarse compound polishing cloth | Coarse | Heavy tarnish on sturdy, unlacquered hardware only, after testing | No reference price available |
Plain fabric has no added abrasive, but trapped grit can still scratch. Inspect the cloth as carefully as the object.
What to check before buying
Look for a stated metal compatibility, an explanation of whether the fabric is impregnated, and care instructions. Soft fabric doesn't guarantee gentle polishing if it carries an aggressive compound. Likewise, anti-tarnish wording doesn't establish suitability for lacquer or plating.
Choose a size you can fold into clean working faces without bunching it under your fingers. Larger cloths suit broad panels; smaller folds give better control around fittings.
Practical rule: Keep a plain soft cloth for dusting and coated finishes. Reserve each abrasive cloth for a defined job on confirmed solid, unlacquered brass.
Finishes, Ultrasonic Cleaners and Safety Limits
Inspect a hidden area before using any treated cloth. A continuous glossy film, peeling edges, or patches showing a different underlying colour are reasons to pause. A barely damp cotton swab can help distinguish loose dirt from the surface beneath, but it won't conclusively identify a coating.
The Partners for Sacred Places brass and copper care guide distinguishes coated surfaces from bare metal and recommends minimizing repeated polishing. Lacquered or gilded brass generally needs dusting or gentle damp cleaning, not abrasive treatment.
Keep the different jobs separate:
- Cleaning: Remove loose dust, oils, and grime without deliberately cutting the metal.
- Buffing: Lift remaining residue and improve the appearance with clean, untreated fabric.
- Abrasive polishing: Remove tarnish and some underlying metal with a treated cloth.
Use the finish, rather than the amount of darkening, to choose among them.
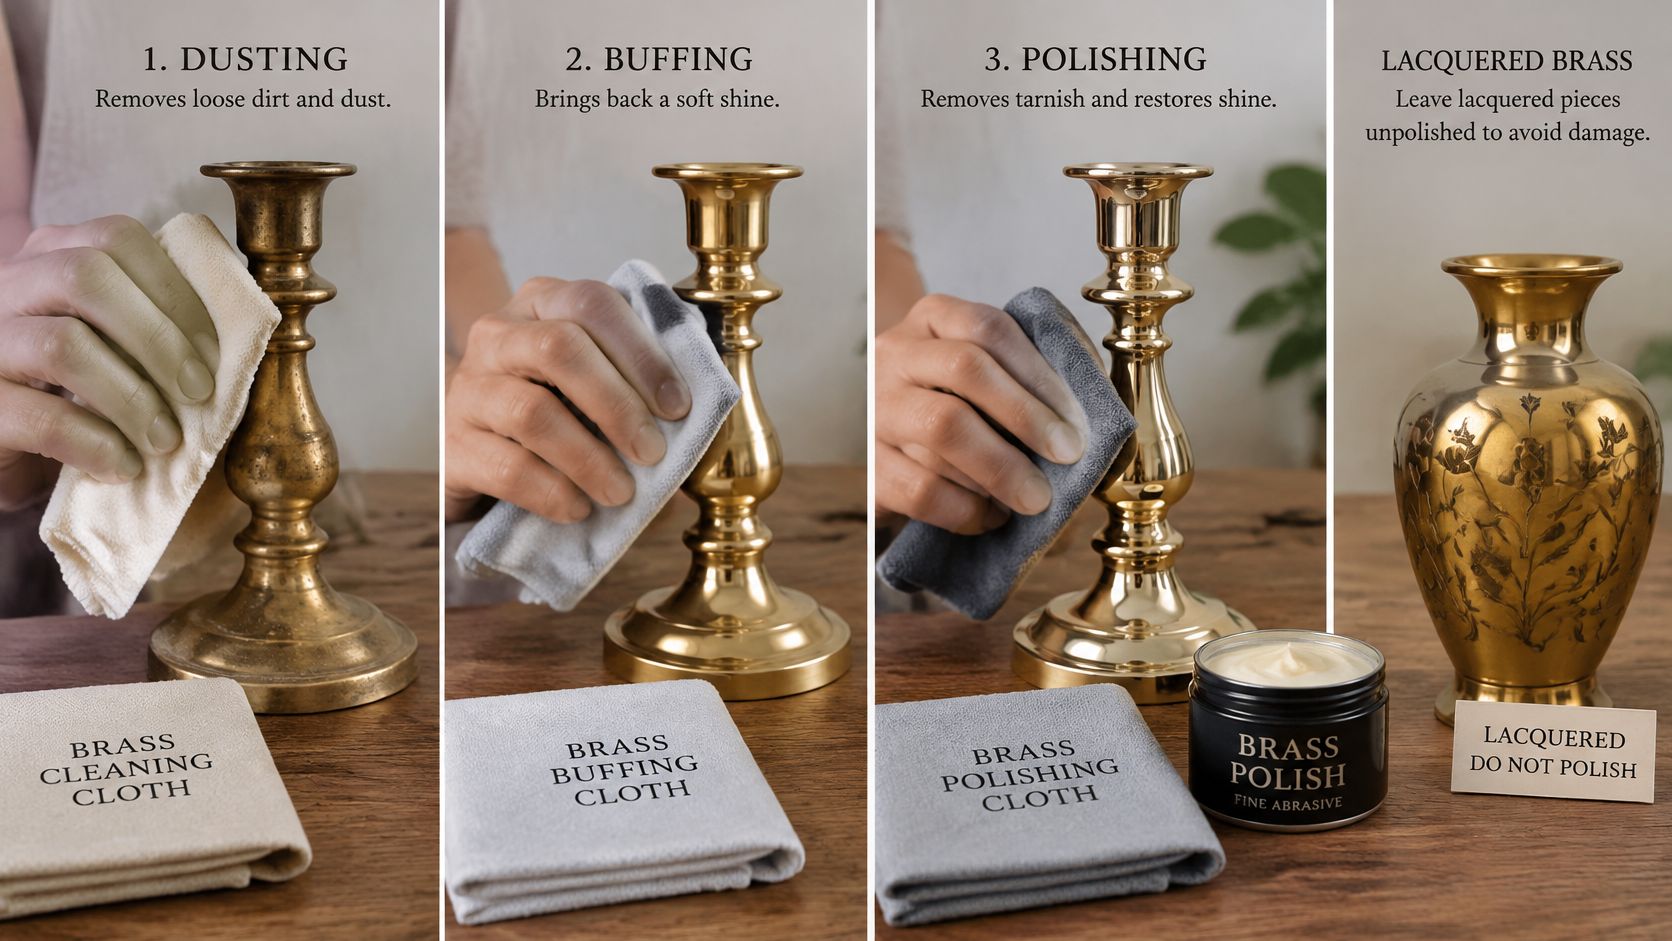
Compatibility comes before the cleaning method
- Lacquered brass: Leave intact lacquer in place. Don't strip it merely to reach a dark patch underneath.
- Plated brass: Use untreated fabric gently. Colour changes at edges may indicate existing wear.
- Patinated brass: Preserve intentional darkening rather than chasing a uniform golden colour.
- Pearls and opals: Keep abrasive cloths off the stones. Avoid jewelry-cleaning solution on pearls, opals, and soft or porous stones unless tested first.
- Instruments: Establish which surfaces are lacquered and follow the instrument maker's maintenance instructions.
Ultrasonic cleaning isn't a universal preliminary step. Use it only for objects whose metal, finish, stones, and construction are compatible; the guide to jewelry that shouldn't go in an ultrasonic cleaner helps identify exclusions. Don't immerse assembled lamps, historic fittings, or unknown heirlooms just because they contain brass.
For a compatible item, remove grime first, dry it fully, and assess what remains before reaching for an abrasive.
How to Prepare and Polish Brass Step by Step
Work from least to most abrasive. The Canadian Conservation Institute's brass and copper care notes identify jeweler's cloth as a fine-abrasive method and warn that excessive rubbing can damage the surface. More pressure isn't a substitute for choosing the right treatment.
Use this preparation sequence before opening the treated cloth.
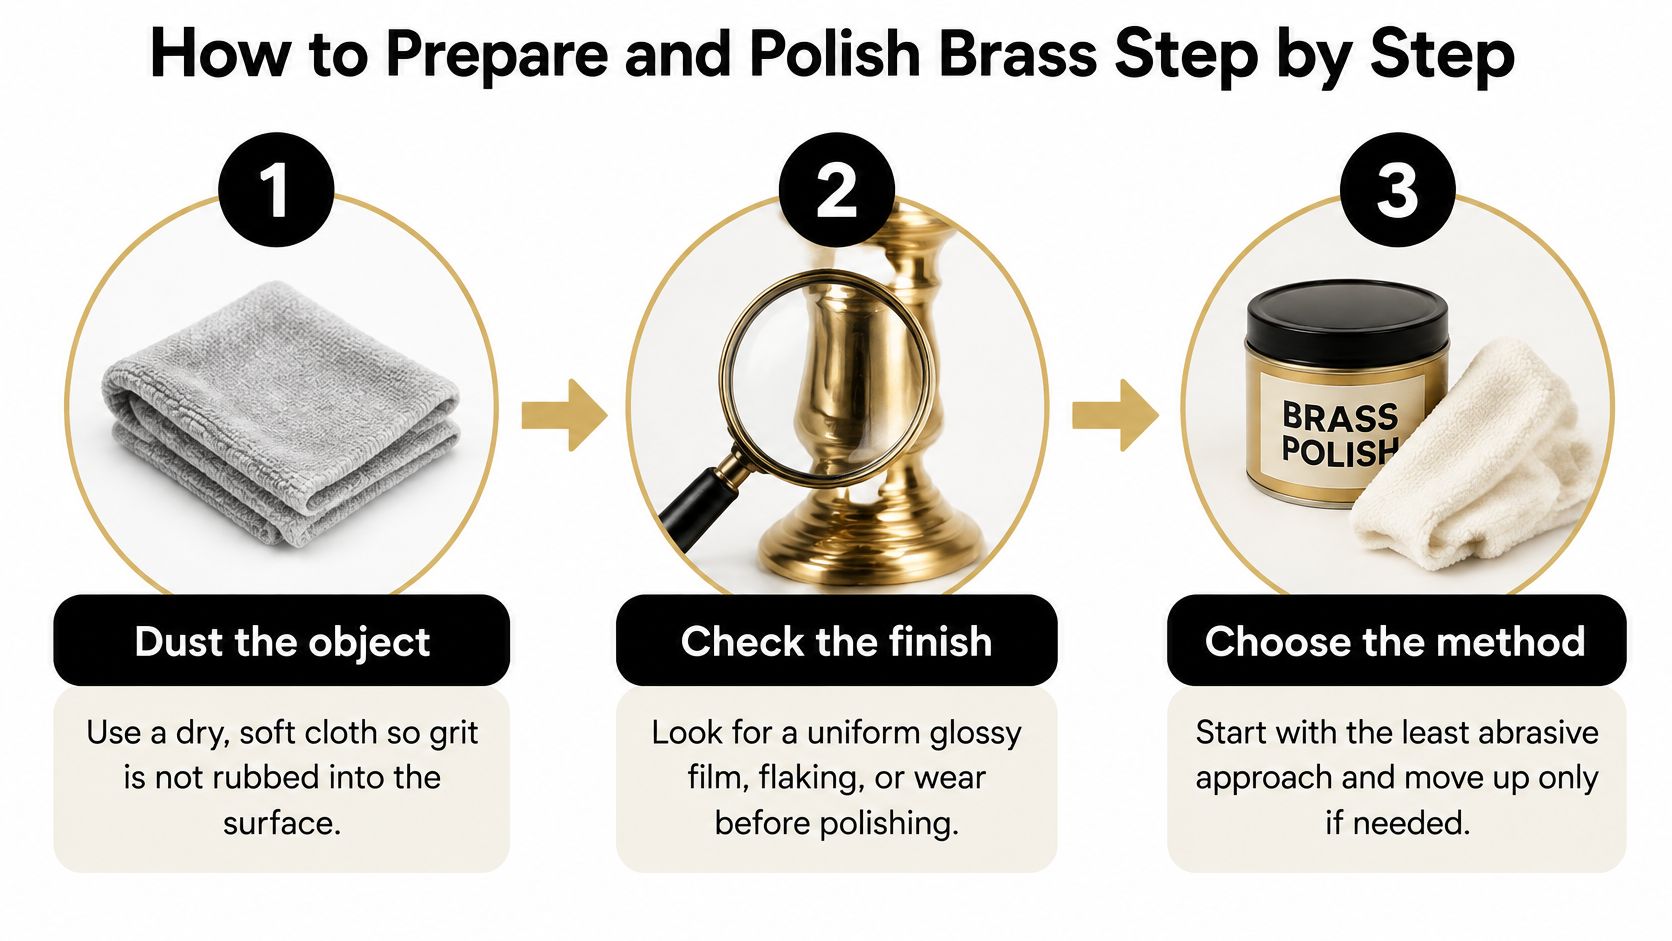
Prepare a stable working area
Set the object on a clean, folded towel where it won't rock or slide. Remove rings and bracelets that could contact the surface, and arrange a lamp so light falls across the brass rather than directly into your eyes.
- Dust with dry, soft fabric. Lift loose particles before rubbing, using a soft brush where cloth can't reach. Don't drag gritty dust across a broad panel.
- Confirm the finish. Examine the underside, screw surrounds, and protected areas for film, flaking, or worn patches. If the finish is uncertain, limit the work to gentle dusting rather than using polish as a diagnostic test.
- Photograph the starting condition. Take a clear view under side lighting, including existing scratches and colour differences. Without that baseline, it's easy to mistake old wear for a new problem or overlook gradual changes.
- Test a concealed zone. Support the cloth across your finger pads and move the treated face lightly over a small area. Use enough pressure to maintain contact, not enough to bow thin metal or force fabric into decoration.
- Inspect before continuing. Turn the piece under oblique light and compare the test zone with its surroundings. Stop if you see new hairlines, an exposed different colour, or an abrupt change in gloss.
Polish only as far as necessary
- Work in small sections. On flat areas, use light, straight, even strokes rather than scrubbing circles; follow an existing directional finish where present. Keep off sharp edges and raised ornament, where concentrated rubbing can soften detail.
- Lift residue with a clean face. Fold the cloth as it loads, then use its clean outer layer to remove loose compound. Don't push dark residue into joints or repeatedly rub it across the next section.
- Buff with fresh, lint-free fabric. Use untreated soft cotton to remove the remaining haze without adding more compound. If buffing exposes a patchy result, inspect it rather than immediately starting another polishing round.
- Clear recesses and finish dry. Lift loose residue with a soft brush and check seams, feet, and screw heads. If damp cleaning was needed, absorb remaining moisture before returning the object to display or storage.
This video offers a further visual reference for the handling and polishing process.
The stopping point is an even, appropriate finish with crisp detail, not the brightest reflection you can produce.
Polishing Jewelry, Fixtures and Instruments Differently
Polishing approach by brass item
| Item | Check first | Cloth approach | Polishing frequency |
|---|---|---|---|
| Solid brass door hardware and fittings | Lacquer or raw metal | Impregnated cloth, light straight passes, no circles | When unwanted dullness is visible in daylight |
| Lacquered decor, lamp bases and frames | Intact, even lacquer | Dry soft cotton only, no abrasive | Dust regularly instead of routinely polishing |
| Costume, plated jewelry and clasps | Plating and worn spots | Soft cloth only; abrasives reserved for confirmed solid, uncoated clasps | Avoid frequent abrasive polishing |
| Brass instruments | Lacquer and exposed raw areas | Gentle exterior wiping; polish only approved bare areas, keeping away from valves and slides | Wipe and dry after playing; abrasive polish only when warranted |
| Antiques, heirlooms and architectural brass | Historic patina and original finish | Ask a conservator before abrasive work | Don't polish routinely |
Jewelry and household fittings
A necklace can combine solid brass findings, plated links, glued decoration, and stones. Treat each component according to its construction rather than dragging a treated cloth across the whole assembly. For a more focused routine, use the guide to cleaning brass jewelry.
When comparing secondhand pieces, resources such as the Idaho Pawn & Gold Exchange jewelry selection can help you frame questions about material and construction before purchase. Ask whether a piece is solid metal or plated, and whether its stones or decorative elements require separate care.
Door hardware presents a different problem: fingers leave grime around handles, while recesses collect dust. Clean those areas before deciding the whole fitting needs polishing, and keep compound out of keyholes and working mechanisms.
Why instruments need restraint
Instrument care makes the trade-off particularly clear. A University of Cagliari instrument-conservation thesis describes a 14-month study in which corrosion rates were approximately twice as high after extended playing, while instrument interiors remained above 60% relative humidity for many days without active drying.
The thesis also explains how polishing can remove an existing protective surface film. A newly bright surface therefore isn't automatically a better-protected surface.
Keep treated cloths away from valve and slide internals. Wipe permitted exterior surfaces gently, and use the instrument's prescribed drying routine after playing rather than trying to compensate for moisture with more polishing.
For decorative objects, assess unwanted dullness in daylight. Avoid scheduling abrasive work just because another cleaning day has arrived, and don't mistake the colour of an intentionally aged finish for neglect.
Keeping Your Polishing Cloths Clean and Ready
A fine polishing compound becomes a poor tool when its fabric picks up grit. A cloth dropped on a workshop floor shouldn't go straight back onto a lamp base, even if the clean-looking corner seems usable.
The Henry Ford brass and bronze conservation guidance describes ultra-fine calcium carbonate particles approximately 1.2–1.6 microns in size, applied with clean cotton. That's a reference for controlled conservation polishing, not a specification for every commercial cloth or a reason to mix your own abrasive.
An after-use routine
- Inspect before folding: Look for grit, hard particles, and dried deposits. Don't merely fold contamination out of sight.
- Separate by purpose: Label plain dusting cloths, final-buffing cloths, and treated polishing cloths so they don't get swapped.
- Protect clean faces: Fold a usable surface inward and store the cloth flat in a clean, closed bag after it's dry.
- Wash plain fabrics separately: Launder untreated cotton and microfiber without fabric softener, rinse thoroughly, and air-dry in a clean place.
- Check treated-cloth instructions: Don't assume an impregnated cloth is washable. Washing can remove the compound that makes it work.
- Keep grades apart: Never store a coarse-compound cloth against the fabric used for final buffing.
Know when to retire a cloth
Darkening alone doesn't establish that a treated cloth is finished. Check whether it still feels supple, releases residue cleanly, and produces an acceptable result on a suitable test zone.
Retire it if it feels gritty or stiff, has hard deposits, or leaves persistent streaks despite using an unused face. Replace an ineffective cloth instead of compensating with heavier pressure.
Storage check: A sealed bag protects a clean cloth from new dust. It doesn't make a dirty cloth safe to use.
Troubleshooting Streaks, Scratches and Dull Spots
Streaks or haze after buffing often mean you're moving compound around rather than removing it. Start with fresh dry cotton before assuming the brass needs stronger polish.
Colour alone won't identify every cause. Look at where the change appears, whether the surface feels loose or powdery, and whether you're seeing a coating rather than bare metal.
Brass polishing symptoms, causes and fixes
| Symptom | Likely cause | Fix |
|---|---|---|
| Streaks or haze after buffing | Leftover compound or a dirty cloth face | Switch to a clean face, then buff with fresh dry cotton |
| Fine scratches in one direction | Grit in the cloth or excessive pressure | Stop using that cloth; wash plain fabric or replace treated fabric, then reassess before further work |
| Scratches or wear on edges | Abrasive working through thin plating or lacquer | Stop; use dry cotton only and check the finish |
| Dull patches returning quickly | Moisture exposure and renewed surface oxidation | Dry fully after cleaning and use clean, dry storage |
| Uneven gloss on lacquered brass | Abrasive may have thinned or lifted lacquer | Stop polishing; ask a conservator about treatment |
| Black or grey marks in storage | Possible environmental tarnishing, including sulfur exposure | Inspect, dry, and store away from rubber and wool in a clean enclosure |
| Green residue in recesses | Possible corrosion or trapped cleaning residue | Lift only loose material with a soft brush; seek assessment if it persists |
What can be corrected at home
Loose buffing haze can often be removed during the same cleaning session. Work with untreated fabric and check the result under side light; don't add more abrasive merely because the residue is stubborn.
New scratches, exposed base metal, and missing lacquer aren't residue problems. More rubbing may make the surrounding surface equally damaged, but it won't restore what's gone.
Green material deserves caution, especially if it returns or appears powdery. Don't dig into recesses with a pin or use an improvised chemical treatment on an unknown finish.
Stop if the object is plated, coated, flaking, or antique and the cause remains uncertain. Preserve the cloth and a photograph of the affected area so a conservator can assess what happened.
Decide How Much Polishing Your Brass Needs
Use a simple rule: clean first, polish only unwanted tarnish that remains, and preserve intentional patina and historic lacquer. The aim is a clean object with its character intact, not a matching mirror finish across everything in the house.
Buy for that distinction. Choose a plain soft cloth for coated surfaces and a fine impregnated cloth for confirmed solid, unlacquered brass. Keep them separate so a quick dusting doesn't become accidental abrasive treatment.
Choose the next action, not a stronger abrasive
If grime is the main problem and the item is ultrasonic-compatible, our Evo Dyne ultrasonic jewelry cleaner solution is formulated for ultrasonic machines and removes dirt, oils, and light tarnish; heavy tarnish may need multiple cycles. It's a cleaning option for suitable jewelry, not permission to immerse unknown brass finishes or delicate assemblies.
For a household ornament that already looks clean after dusting, put the polishing cloth away. For a tested bare-brass fitting, stop once its tone is even and the unwanted tarnish has lifted.
Make your next purchase a matched pair of cloths, not the most aggressive product available. Careful selection, clean fabric, and a clear stopping point help you maintain the finish without unnecessary wear.
Evo Dyne Products offers jewelry-care solutions and practical cleaning guidance to help you choose an appropriate cleaning step before polishing. Visit Evo Dyne Products to explore ultrasonic jewelry cleaner options, and confirm your item's compatibility before starting.